
Meters in CR2
Reference No : 24005
Details
In Cr2, you will be able to use the Meter feature to record Meter Reading for an asset of a serial item and to charge the customer based on the Meter Reading.
Meter Charges effect on Revenue Calculations
Revenue from a meter-tagged asset includes its meter charges as calculated from its meter readings.
Depreciation, if based on percentage, is calculated upon the total amount inclusive of the meter charges.
Damage Waiver and Consumable are also calculated for the total amount
If a Misc.Charge is tagged to a meter then the charges arising out of metering an asset will get added to the Order as a separate Misc.Charge.
Meter Implementation
The implementation of the Meter feature involves the following steps:
Creating a new Meter Definition.
Creating Meter Group with one or more Meter Definitions added to it.
Tagging a Meter Group to the Item for which Metering has to be done.
Metering Windows.
Updating Meter Readings.
Metering of various types of Orders.
The various steps involved in the implementation of the Meter feature in CR2 are explained below.
Creating a New Meter Definition
Defining a Meter is the process of setting the name and metering value of that particular Meter.
Steps to create a new Meter Definition are:
In CR2 Launch Pad, click on Maintenance > Misc.
CR2 displays the Misc window.
Click on Meters Icon to switch to Meters Sub-module.
Click on New icon to display the Meters window as shown in the following Fig 1.0.
Fig 1.0 Meters Window
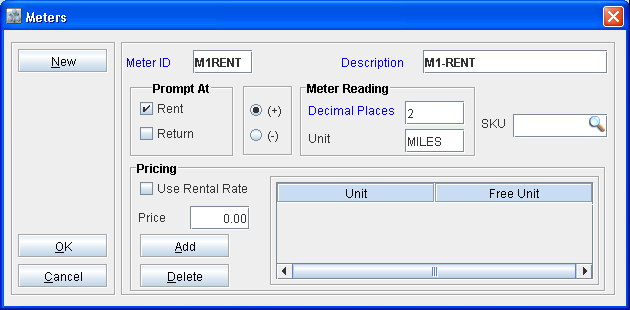
Enter the Meter ID and Description, which are mandatory.
Select the Prompt At options,Rent and/or Return, if the Meter Readings window has to be displayed while filling and/or returning items of an Order.
Within Meter Reading properties, Unit is the unit of calculation of the meter reading.
Decimal Places determine the power of 10 with which Charge (Chargeable Units x Meter Price) needs to be divided so as to compute the final Amount that the customer will be charged for this meter.
For example, assume that:
Meter Start Reading = 50
Meter Current Reading = 100
Free Units = 5
Chargeable Units ((Meter Current Reading - Meter Start Reading) - Free Units) = ((100-50) - 5) = 45
Meter Price = 10$
Decimal Places = 2
Charge = Chargeable Units x Meter Price = 45 x 10 = 450
Amount (charged to customer) = Charge/10Decimal Places = 450/102 = 450/100 = 4.5$
Within Pricing properties, Free Unit is used to grant free metering units, on a daily/weekly/monthly basis, to the customer. This can be added by pressing the Add button.
In the SKU field you can tag any Misc.Charge to this meter.
Note: If a Misc. Charge is tagged to a meter then the charges arising out of metering an asset will get added to the Line level of an Order as a separate line named as Misc. Charges
Click OK, to save the Meter Definition.
A new Meter Definition is successfully created. This can now be added to any item and can be used for metering its assets on any Order.
Meters Definition Window &endash; Fields Information
Field | Description |
Meter ID | Meter Definition ID. |
Description | Meter Description. |
Prompt At | |
Rent | If selected, CR2 will display the Meter Dialog at the time of Filling Items on an order, where in you can enter the meter reading value |
Return | If selected, CR2 will display the Meter Dialog at the time of Returning Items on an order; where in you can enter the updated meter reading value. |
Meter Reading | |
(+) | Selecting this option will set the meter reading as of type increasing. |
(-) | Selecting this option will set the meter reading as of type decreasing. |
Decimal Places | Decimal Places determine the power of 10 with which Charge (Chargeable Units x Meter Price) needs to be divided so as to compute the final Amount that the customer will be charged for this meter. |
Unit | You will be able to use the Unit field to define the unit of calculation for the Meter defined. For example, MILES for distance or HOURS for time. |
Price | The Price field can be used to pre-define the charge per unit for the Meter defined. |
SKU | The SKU field can be used to tag a Misc. Charge item to the Meter defined.
|
Note: You will not be allowed to edit/update the Meter Reading for an asset, if the asset is in filled status. However you will be allowed to update the Meter Reading on returning the asset.
Creating Meter Group with One or More Meter Definitions Added
Steps for creating a new Meter Group with one or more Meter Definitions added to it are:
Access Equipment > Edit Window.
Click on the Importable button in the Meter field.
Fig 2.0
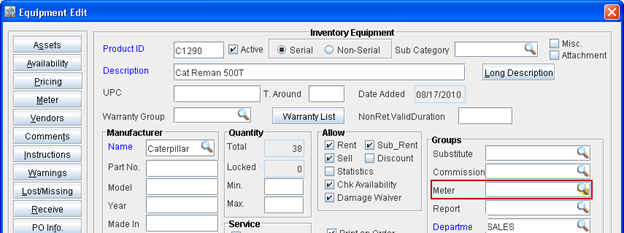
CR2 will display the Meter Group window with existing Meter Group Definitions and Meter Definitions tagged to it, if any, as shown in Fig 3.0 below.
Fig 3.0
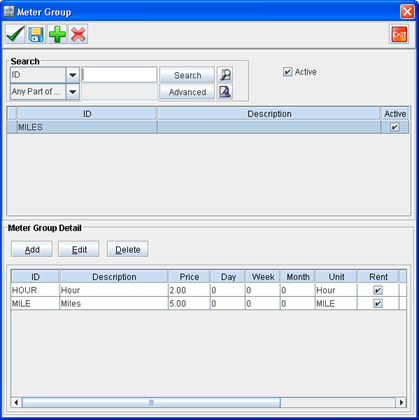
Click on Add icon to create a new row.
Enter the ID and Description for the Meter Group and press Enter.
The newly created Meter Group will be listed in the Meter Group window as shown in Fig 4.0 below.
Fig 4.0
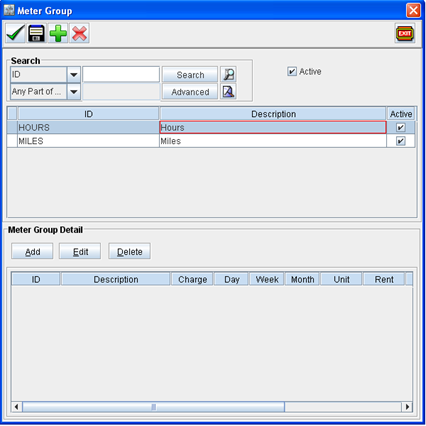
Highlight the new definition and click Add button from Meter Group Detail section.
CR2 will display the Meter List window as shown below. Here you can Add/ Modify/ Delete existing Meter Definitions. You can also search and tag Meter Definitions to the Meter Group.
Fig 5.0
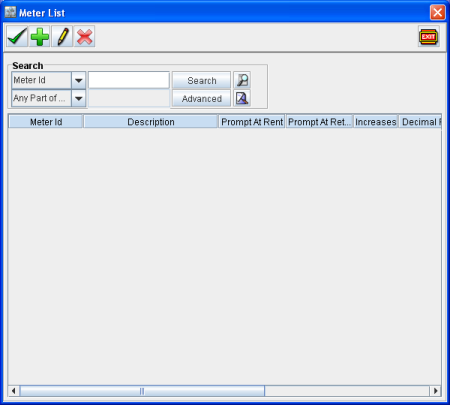
Search for the desired Meter Definitions.
Double-click on the Definition to attach it to the Meter Group.
Click OK icon.
The newly created Meter Group will be displayed with attached Meter Definitions in Meter List window as shown in Fig 6.0 below.
Fig 6.0
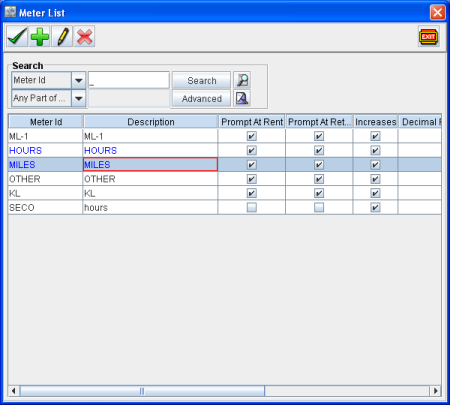
The selected definitions will be displayed in the Meters Group window as shown in Fig 7.0 below.
Fig 7.0
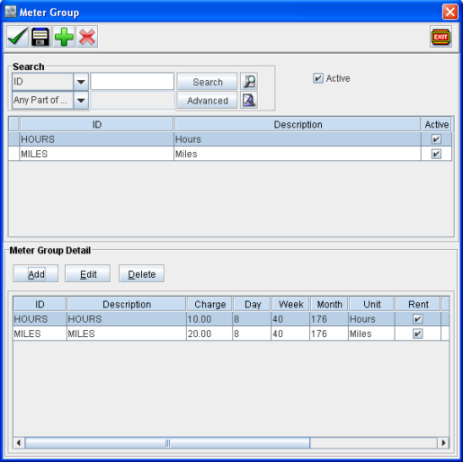
11. Click on Save icon to save the changes.
Tagging Meter Group to Item for which Metering has to be Done
Access Maintenance > Item > Equipment > Edit window.
Click on the Importable button in the Meter Field.
System will display the Meter Group window.
Double-click on a Meter Group Definition.
Click on Tag button.
Click on Save button.
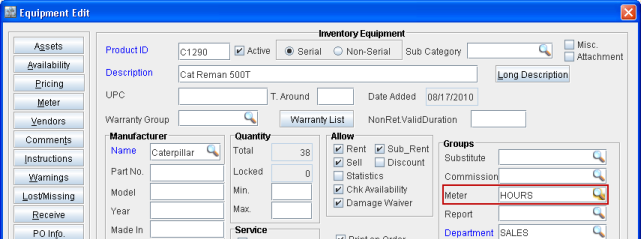
The tagged Meter Group Definition will be displayed in the Equipment Edit window's Meter field as shown below.
Fig 8.0
Metering Windows
Meter Readings window
This window has the <Asset's ID> - <Description> as title, as shown in Fig 9.0 below.
Fig 9.0
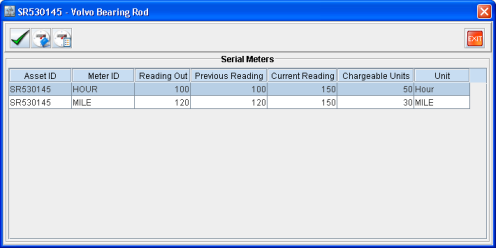
This window can be accessed in multiple ways as explained below.
Select a meter-tagged item from line level of an order > View drop-down menu > Meters > By Line.
It pops-up when a meter-tagged asset is about to be filled or returned to an Order, depending upon the settings in the Prompt At section within the Meter Settings of the Meter tagged to this asset.
Right-click on an Asset at the Line level of a Rental Order > Select ViewLineMeters.
Meters Readings Window &endash; Fields Information
Column Names | Functionality |
Asset ID | The ID of the asset to which this meter was added. |
Meter ID | The unique ID of the meter. |
Reading Out | The meter's reading at the time of filling the item. |
Previous Reading | The meter reading entered just before entering the current reading. |
Current Reading | The last recorded meter reading. |
Chargeable Units | Total chargeable units for this meter = Last recorded Current Reading - Starting Reading. |
Unit | Unit upon which this meter's reading is counted. |
Meter Details window
This window, as shown in Fig 9.1 below, can be used for correcting the value of any existing meter readings.
Fig 9.1
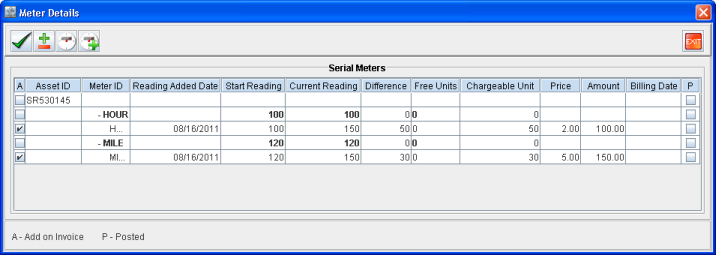
It can also be used for adding a new meter reading value to the meter, by pressing the Add New Reading icon.
The Meter Details window can be accessed by:
Clicking the Meter Details icon in the Meter Readings Window.
Clicking the Meter Details icon from the Meter Charges window.
Note: The Meter Charges window will pop-up while Invoicing an Order with at least one meter-tagged item added to it.
Meters Details Window &endash; Fields Information
Column Names | Functionality |
A | Select this column to add this meter charges to the invoice. |
Asset ID | The ID of the asset to which this meter was added. |
Meter ID | The unique ID of the meter. |
Reading Added Date | The reading added date for meter readings added from the meter details window. |
Start Reading | The start reading of this meter for this asset. |
Current Reading | The current reading for this meter. |
Difference | Difference between the current reading and start reading for this meter. |
Free Units | The amount of units for this meter which are not charged. This is set in Misc > Meter > Meter Settings. |
Chargeable Unit | The total chargeable units for this meter reading. Chargeable Unit = Difference - Free Units. |
Price | The charge per unit for this meter. |
Amount | The total amount for this particular meter reading. Amount = Chargeable Unit x Price. |
Billing Date | The date from which this meter reading's charge will get added to an invoice. |
P | If the meter reading line is added to a posted invoice then this will be checked. |
Meter History window
This window, as shown in Fig 9.2, can be used for viewing the meter values change history of a meter-tagged asset.
Fig 9.2
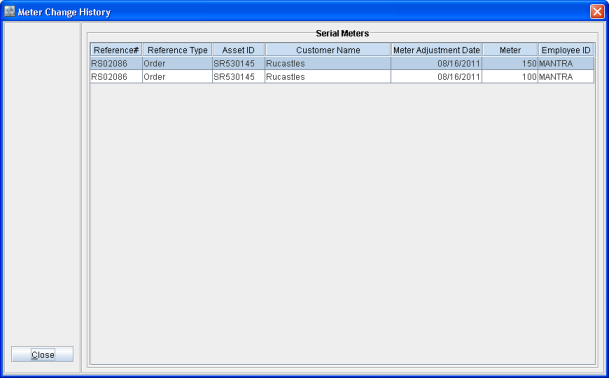
Meters History Window &endash; Fields Information
Column Names | Functionality |
Reference# | The Order ID from where the Meter Reading is updated. |
Reference Type | Shows source from where Meter was modified. |
Asset ID | The ID of the Asset to which this Meter was added. |
Customer Name | Name of the customer for whom the Order is created. |
Meter Adjustment Date | Date on which the Meter Reading was modified. |
Meter | The change history for this Meter. |
Employee ID | The ID of the Employee who changed the Meter. |
Meter Charges window
This window, as shown in Fig 9.3, can be used for selecting the assets whose meter charges needs to be added to the present invoice by clicking on the Tag or Tag All icons.
Fig 9.3
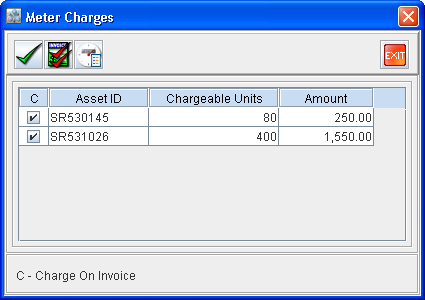
Meters Charges Window &endash; Fields Information
Column Names | Functionality |
C | Select this column to charge that meter amount to the current invoice. |
Asset ID | The ID of the asset to which this meter was added. |
Chargeable Units | The total chargeable units for this meter reading. Chargeable Units = Difference - Free Units. |
Amount | The charge per unit for this meter. |
Security Settings for Prompting of Meter Charges Window
Security settings for Meter Charges window can be done at CR2 > Security > Account > Meter Charges. If Read only or No Access is set for the Meter Charges window at screen level then, while invoicing the rental order, Meter Charges window will not be prompted. But still the amount calculated based on meter charges will be considered while invoicing.
Updating Meter Readings
The ways in which the meter of a meter-tagged asset can be updated are:
When the asset is filled in an order - if Rent check box is selected at Maintenance > Misc > Meter > Prompt At. The Meter Readings window pops-up and you can change the Reading Out field's value for the meter.
When the asset is returned to an order - if Return check box is selected at Maintenance > Misc > Meter > Prompt At. The Meter Readings window pops-up and you can change the Reading In field's value for the meter.
Using the option View > Meters > By Line, after selecting the asset at the line level. The Meter Readings window pops-up and you can change the Reading Out field's value or the Current Reading field's value for the meter.
By accessing the Meter Details window and changing the Current Reading of the meter or by adding a new meter reading by clicking the Add New Reading button.
Right-click on an asset at the line level of a Rental Order > Select ViewLineMeters. The Meter Readings window opens with focus set on Current Reading. Change the Current Reading value and save.
Note: If any invoice is already posted for the Order, system will not allow modifying the Meter Reading and the applicable charges.
Metering of Various Types of Orders
Metering a Rental Order
In a Rental Order with at least one meter-tagged asset, on filling the items, the Meter Readings window will pop-up as shown in Fig 10.0 below. The focus will automatically be set to the Reading Out field.
Fig 10.0
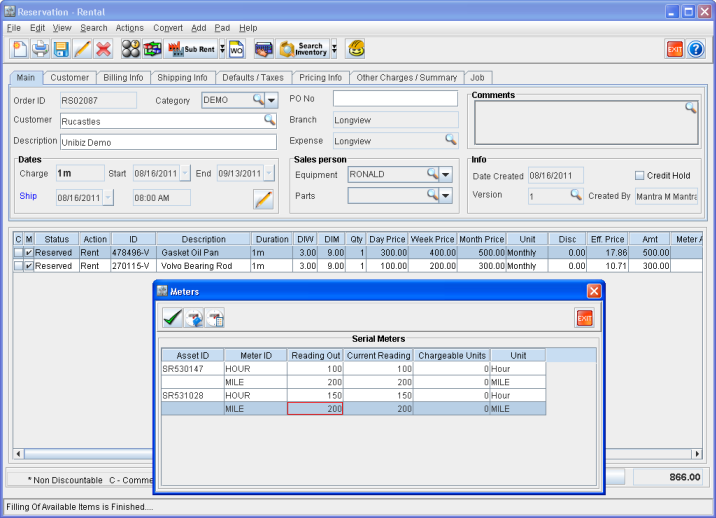
Notes:
This will happen only if the Prompt At > Rent check box is selected in the meter's settings.
In this window you will be allowed to set the Reading Out meter values for all the Meters tagged to that particular asset. Meter charging of a meter on the order will start from the Reading Out value of that meter. Once you enter the value in the Reading Out field it gets copied automatically to the Current Reading field as well.
For example, if you enter the Reading Out value as 125 for the meter named Hour, then the Current Reading field value will be updated to 125 for that meter automatically.
New Meter Readings can be added to this asset by:
Accessing the Meter Details window and adding new meter readings as explained previously in this document.
Accessing the Meter Readings window and entering new readings within the Current Readings column and saving it, as shown in Fig 10.1 below.
Fig 10.1
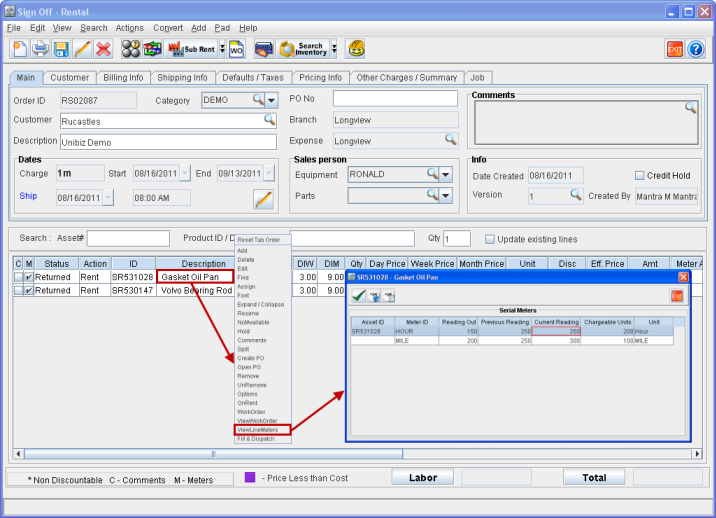
On returning the items the Meter Readings window will pop-up, as shown in Fig 10.2 below, with focus on the Reading In field.
Fig 10.2
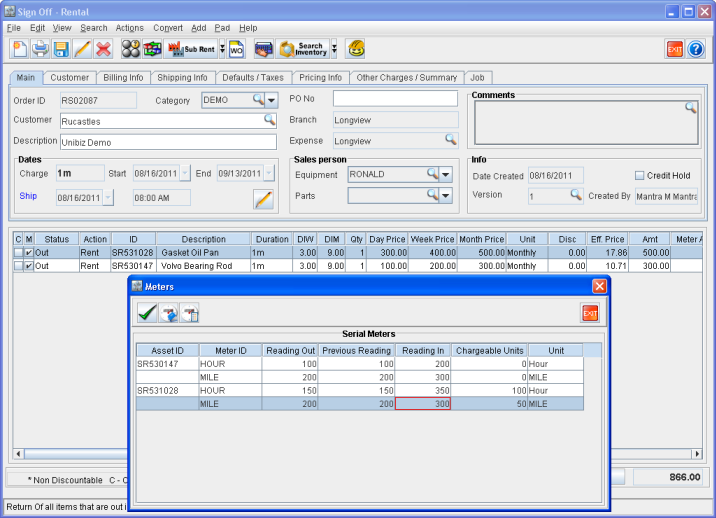
Notes:
This will happen only if the Prompt At > Return check box is selected in the meter's settings.
In this window you will be allowed to set the Reading In meter values for all the meters tagged to that particular asset. Once you enter the value in the Reading In field it gets copied on automatically to the Current Reading field as well.
For example, if you enter the Reading In as 200 for the meter named Hour, then the Current Reading field value will be updated automatically to 200 for that meter.
In a Rental Order the charges arising out of metering will be displayed under the Meter Amt column in the Line level.
An additional column named Total Amt is added to the system. This column displays the sum of the item's amount and its meter charges (as shown in Fig 10.3 below).
Fig 10.3
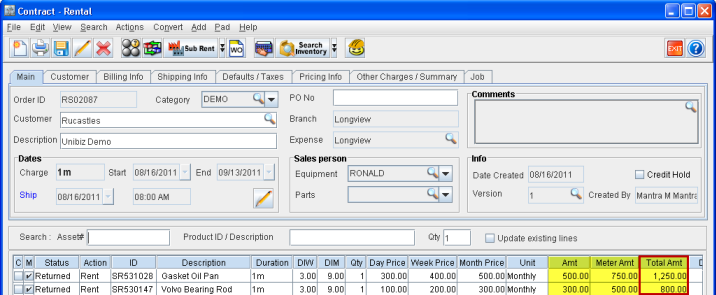
Note: If a Misc. Charge is tagged to a Meter then the charges arising out of metering an asset will get added to the Order as a separate Misc.Charge.
Metering a Work Order
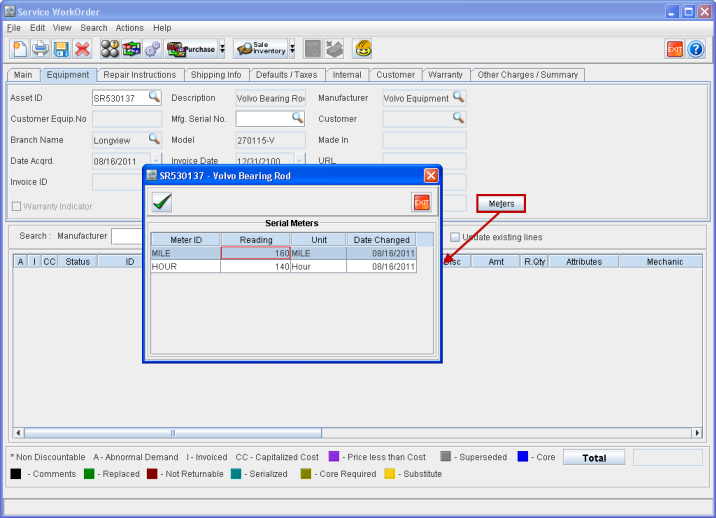
In Work Orders, from within the Equipment Tab, Internal Assets and Machine Ownership Files can be tagged to the Work Order. If any of the added assets are meter-tagged then the meter readings can be changed by clicking on the Meters button as shown in Fig 11.0 below.
Fig 11.0
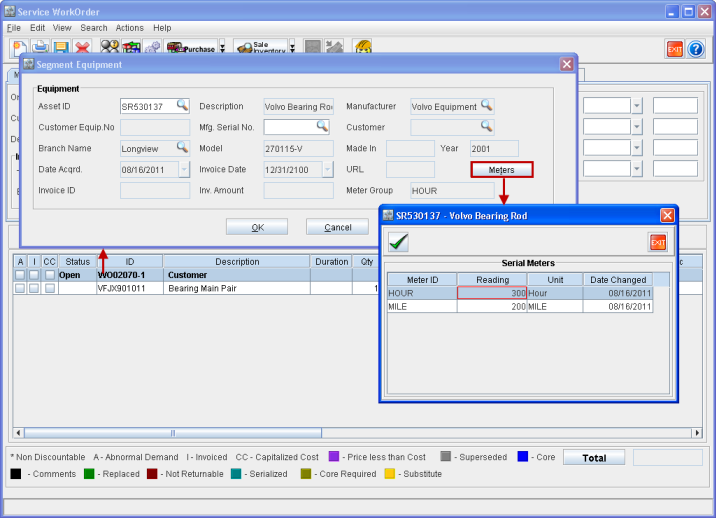
From within a segment of the Work Order, to which a meter tagged asset is added, the meter readings can be modified by double-clicking the segment head > Meter button in Segment Equipment window as shown in Fig 11.1 below.
Fig 11.1
The Meters feature in CR2 has been explained.