
Managing Cross-Reference List for Parts
Reference No:22508
Table of Contents
Details
In Cr2, you can use the feature Parts Configuration present in the Maintenance Module, to manage the Cross-Reference List for a Part / Parts( list of Substitutes, Superseded,Core and Tariff Code). The cross-reference list which is configured for a Part / Parts using Parts Configuration can also be viewed from within the respective Part Edit window.
Accessing Parts Configuration Feature
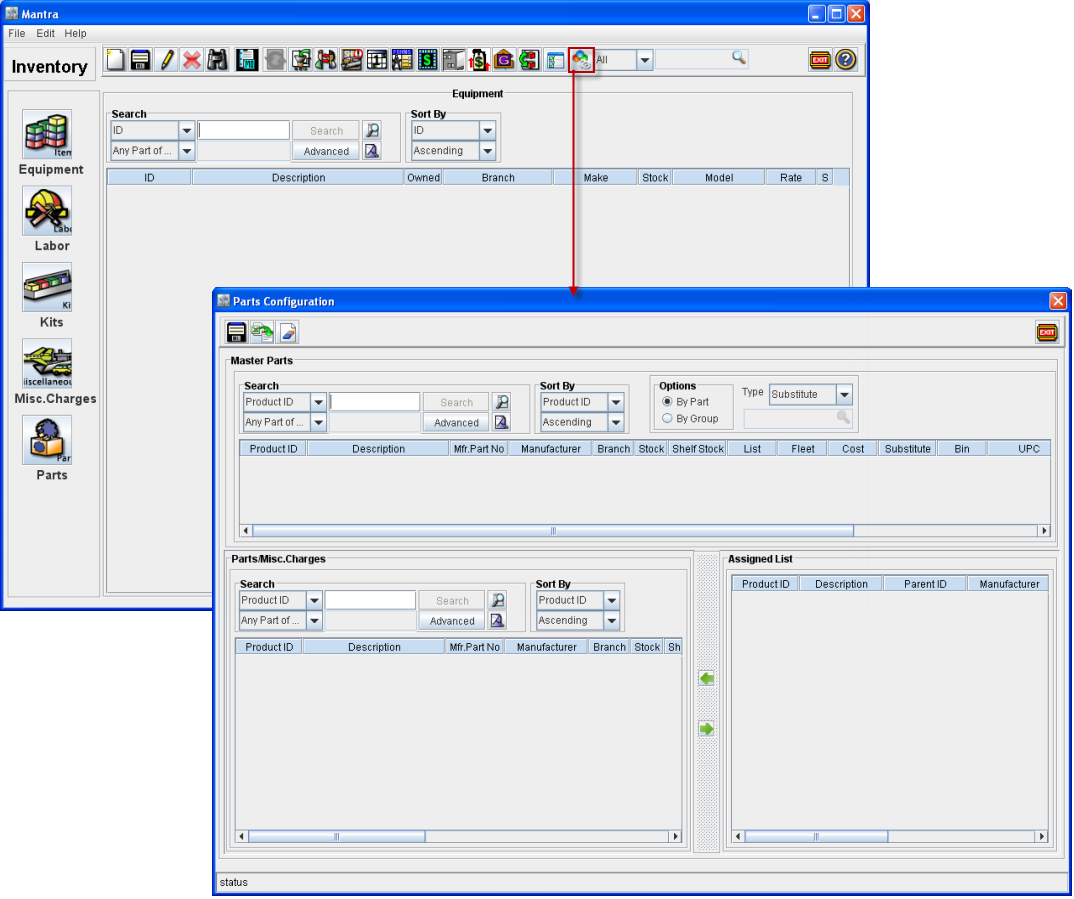
You can access the Parts Configuration feature by selecting the Parts Configuration Setup icon  present in the Maintenance Module main window (Refer below Illustration). On selecting the icon, system will display the Parts Configuration window using which you can manage the cross-reference list configurations for the Parts.
Part Configuration Window Fields Information
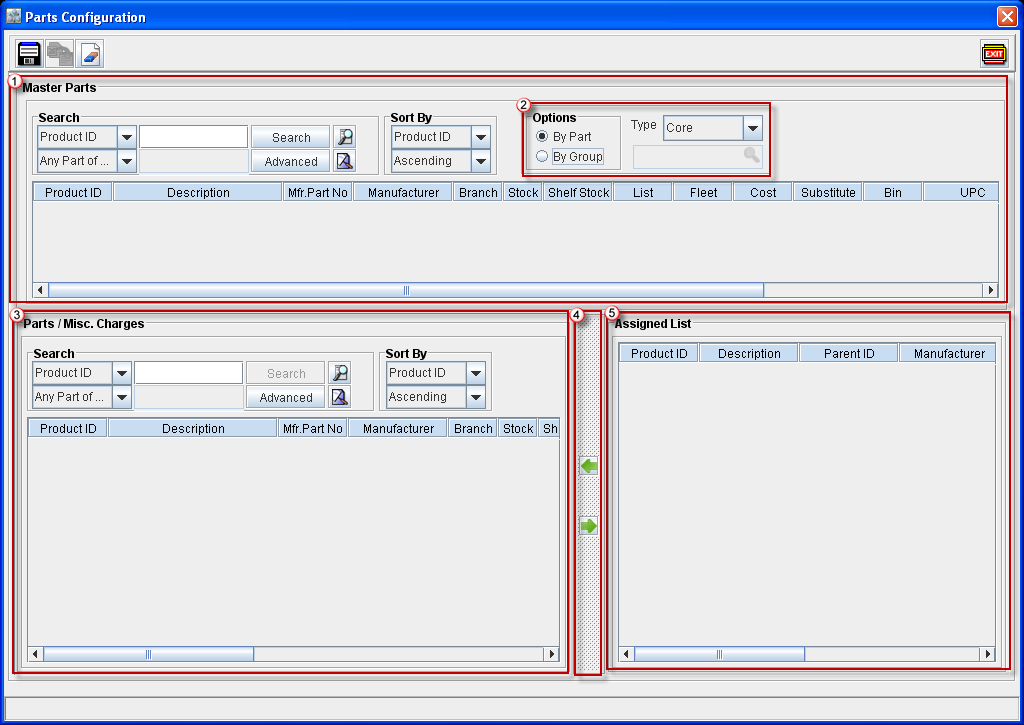
Master Parts
The Master Parts section will allow you to search for the Part/Parts for which configuration has to be done.
Configuration Options and Type Selector
Configuration Options
By Part
The option By Part can be selected, to view and manage the configuration of parts for the selected part based on the Type selected.
By Group
The option By Group can be selected, to view and manage assigned cross-reference list of parts belonging to a selected group. You can select a group using the field present next to the By Group option, which will be enabled on selecting the option.
While substituting parts which are present on the order, parts can be selected added to the Substitute List either from a specific group selected or from the list of parts displayed irrespective of any groups. This can be done by selecting the option By Part or By Group from the Items window displayed by selecting Right Click &endash; Assign &endash; Substitute option.
Note: Currently the functionality for configuring Cross-reference list using the option By Group will be only supported for Type Substitute. Hence for all other types, system will disable the Group selection field.
Type
The Type field present will allow to select the type of configuration that has to be made. The available options present in the field are Core, Substitute, Superseded,and Tariff Code.
Points To Note
Every time on changing the Type selection, system will refresh the Parts Configuration window and the user need to perform the configuration process afresh based on the Type selected.
Parts/Misc. Charges
This section can be used to search for the Parts/Misc. Charges that has to be added to the Part/Parts which are selected in the Master Part Search Area.
Points To Note
On selecting the Type value as Substitute /Superseded / Core, system will allow to search only for Parts in the Parts/Misc. Charge Search section.
On selecting the Type value as Tariff Code, system will allow to search only for Misc.Charges in the Parts/Misc. Charge Search section.
Re-size Bar, Add and Remove icons
Re-Size Bar
The re-size bar present in the Part Configuration Window can be used to adjust the display area of Parts/Misc. Charges Search section and Assigned list section. This can be done by clicking on the Re-size bar and following dragging the bar to the left / right side as per requirement.
Add Icon

The Add To List icon present can be used to select a Part(s) as a substitute/ superseded /core/tariff code (based on type selection) for the Part(s) selected in the Master Parts Search section.
Remove Icon

The Remove From List icon can be used to remove Part(s) from the current list of substitute/ superseded /core/tariff code (based on type selection) present for the Part(s) selected in the Master Parts Search Area.
Assigned List
This section will display the Parts/Misc.Charges which is already assigned for the selected Part/Parts in the Master Parts Search Area.
Points To Note
The type of records (Parts / Misc.Charges) that is displayed in Assigned List section is dependent on the option selected in the Type field.
If the option Substitute/ Superseded/Core is selected in the Type field, then the Assigned list section will display only the parts which are currently assigned for the selected Part/Parts.
If the option Tariff Code is selected in the Type field, then the Assigned List section will display only the Misc.Charges that is assigned to the selected Part/Parts.
On selecting a Part in the Master Part Search area, system will display the Parts/Misc. Charges (based on Type selection) with the selected Part ID as the Parent ID in the Assigned List section.
On selecting multiple Parts in the Master Parts Search area, system will display the Parts and Misc.Charges (based on type selection) which are currently assigned for the selected Parts. However, if a same Part is assigned for multiple parts which are selected, the Part IDs will be displayed separated by comma in the Parent ID field. (Refer Illustration below for more information).
Consider Parts [Part#1], [Part#2] with the Substitute parts present as below:
Part | Substitute Parts | |
Part#1 | DGD1 | DGD2 |
Part#2 | DGD1 | DGD3 |
On performing search with the Type option selected as Substitute , following selecting the Parts[Part#1], [Part#2] in Master Parts Search section , system will display the Assigned List for Parts [Part#1] and [Part#2] as below:
Product ID | Description | Parent ID | Manufacturer |
DGD1 | 52 Tooth Gear - 2 | Part#1,Part#2 | DGD |
DGD2 | Arm Gear Shift Lever-I | Part#1 | DGD |
DGD3 | Bevel Gear | Part#2 | DGD |
On selecting a group in the Parts Configuration window, system will display only the parts belonging to the selected group.
Steps to configure Substitute /Superseded/Core/Tariff Code for a Part
Access Maintenance Module, click on the Parts Configuration Setup Icon
 .
.System will display the Parts Configuration Window.
Select the Type Configuration in Type field. To select a type, click on the drop down arrow present in the field and select any one from the listed options)
Search for the Master Part(s) (Part for which configuration has to be made) in the Master Part Search Area.
Highlight the Part(s). On highlighting, the Parts/Misc. Charges which are currently assigned will be displayed (based on type selection) in the Assigned List section.
In the Search area, search for the Part/Misc. Charges that has to be assigned to the selected part(s).
Move the line(s) to the Assigned List section. This can be done by highlighting a line/lines and following using any of the below methods:
By double-clicking on an Part/ Misc. Charge Line displayed
By clicking on the Add Icon .
On performing any of the method mentioned above, the Part/ Misc. Charge line(s) will be displayed under the Assigned List area.
Click on Save Icon
 present in the Tool Bar to save the settings.
Steps to remove Parts/Tariff Code for a Part from Substitute/ Superseded/ Core/ Tariff Code List
Access Maintenance Module, click on the Group Setup Icon .
System will display the Parts Configuration Window.
Select the Type Configuration in Type field based on the list type that has to be updated for a part. For example, if the Tariff Code has to be removed from the list for a Part, select the option Tariff Code.
Search for the Master Part(s) (Part for which configuration has to be updated) in the Master Part Search Area.
Highlight the Part(s). On highlighting, the Parts/Misc.Charges which are currently assigned will be displayed (based on type selection) in the Assigned List section.
In the Assigned List section, double-click on a line(s) displayed or alternatively click the Remove icon by highlighting the line(s).
The selected line(s) will be removed for the Part(s) which is selected in the Master Part Search Area.
Note: On selecting a Part/Misc .Charge Line which is assigned to multiple Parts, system will remove the selected lines from multiple Parts to which the Part/Misc .Charge is assigned to. Refer below illustration for more details.
Consider Parts [Part#1], [Part#2] with the Substitute parts present as below:
Part | Substitute Parts | |
Part#1 | DGD1 | DGD2 |
Part#2 | DGD1 | DGD3 |
On performing search with the Type option selected as Substitute and following selecting the Parts[Part#1],[Part#2], system will display the Assigned List for Parts [Part#1] and [Part#2] as below:
Product ID | Description | Parent ID | Manufacturer |
DGD1 | 52 Tooth Gear - 2 | Part#1,Part#2 | DGD |
DGD2 | Arm Gear Shift Lever-I | Part#1 | DGD |
DGD3 | Bevel Gear | Part#2 | DGD |
On removing part [DGD1] line from the assigned list, system will remove the Part [DGD1] from the assigned list of Parts [Part#1] and [Part#2].
On removing part [DGD2] line from the assigned list, system will remove the Part [DGD2] from the assigned list of only Part [Part#2].
Click on Save Icon
 present in the Tool Bar to save the settings.
Steps to configure Substitute /Superseded/Core/Tariff Code for a Substitute Group
Access Maintenance Module, click on the Group Setup Icon .
System will display the Parts Configuration Window.
Select the option By Group as the configuration option.
System will enable the import field next to the By Group option. Select a substitute group by clicking the import button present in the field
On selecting a Substitute Group, system will display the list of existing Parts added to the group selected in the Assigned List section.
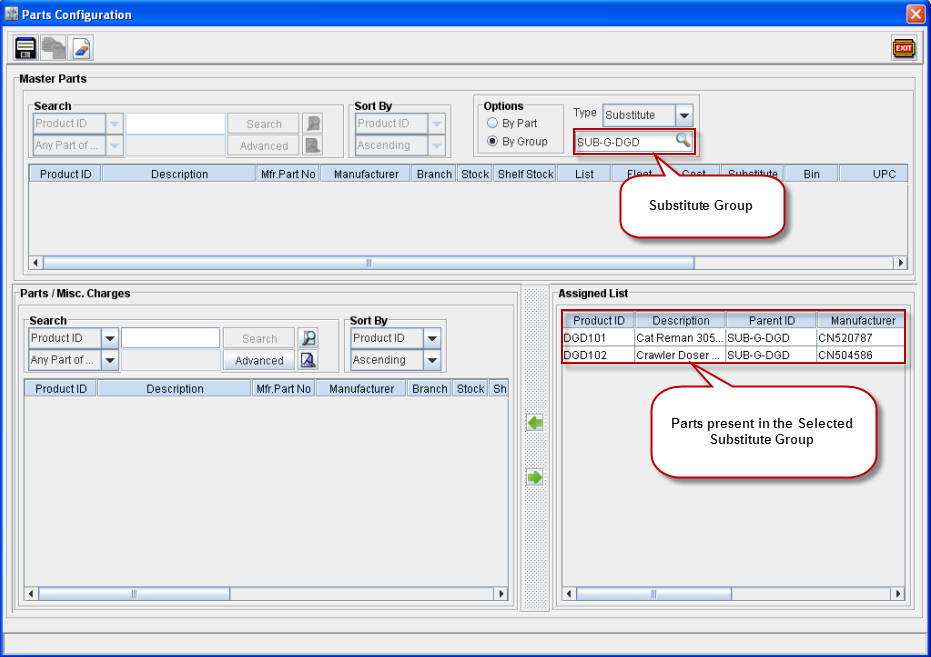
In the Parts/Misc. Charge Section, search for the Part/Parts that has to be added to the selected group.
Move the line(s) to the Assigned List section. This can be done by highlighting a line/lines and following using any of the below methods:
By double-clicking on an Part Line displayed
By clicking on the Add Icon .
On performing any of the method mentioned above, the Part line(s) will be displayed under the Assigned List area.
Click on Save Icon
 present in the Tool Bar to save the settings.
Configuring Substitute Parts from within Part Edit Window
In addition to the method of configuring the substitute parts based on Substitute Groups from within the Parts Configuration Window, you can also view and configure the parts from within the Parts Edit window. This can be from the Parts Configuration window which can be invoked by clicking the import button present in the Substitute Group field. Refer Illustration below :
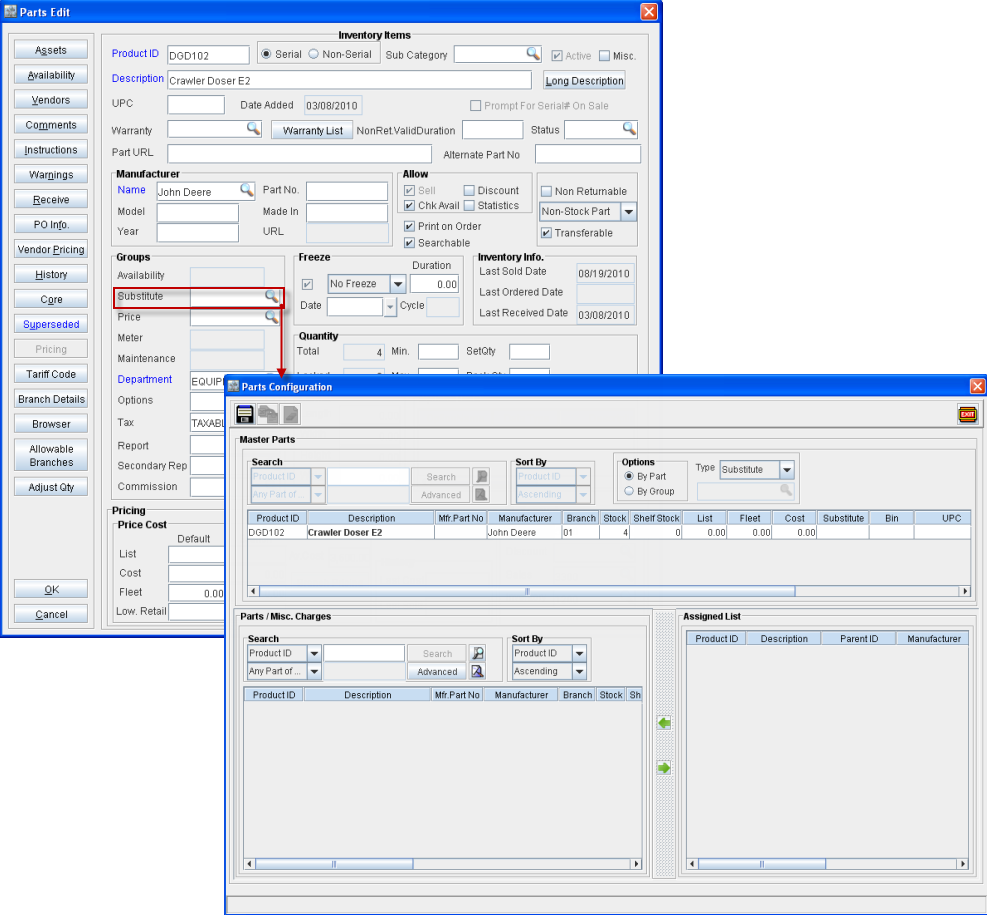
On invoking the Parts Configuration window via Part Edit - Substitute Group field, system will by default display the current Part which is being edited as the Master Part. System will not allow to perform parts configuration for any other part apart from the Part being edited.
From within the Parts Configuration window accessed via Substitute Group field, system will allow to configure cross-reference list only for Type Substitute.
On Invoking the Parts Configuration window with a Substitute Group selected/ present, system will display all the parts which are currently assigned to the selected group in the Assigned List section. The current Part which is being edited will be displayed in blue color in the Assigned List section.
You can add Parts to the Assigned List section by performing search for Parts in the Parts/ Misc. Charge area and following clicking on the Add Icon. Alternatively you can also double-click on the items to add to the assigned list section.
From within the Parts Configuration window, you can create the substitute cross reference list either By Part or By Group by selecting the options accordingly in the Options section.
With a Substitute Group selected and the respective Parts displayed in the Assigned List section, on selecting the configure type option as By Part and then switching back to By Group option, system will retain and display the group selected and the Assigned Parts present in the Parts Configuration window.
Once the configuration is done for substitute list, you select the Save icon present in the Tool Bar, to save the configuration.
Selecting Substitute Parts from within Order Window
While selecting substitute Parts for a Part from within Order Window, you can choose whether to select the Substitute Items from either from the Substitute Group or from the Substitute By Part list. This can be done by selecting the option By Part or By Group from the Items window, that is invoked by selecting the Substitute option. (Right -click - Assign - Substitute option or from Tool Bar Purchase Drop down - Substitute option.
Illustration
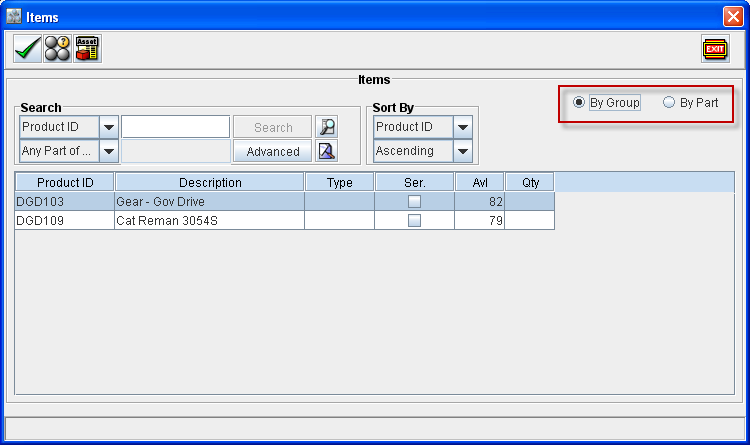
On selecting the Substitute option, system will by default display the option By Group as selected and list of Parts present in the Substitute Group in the Items window, if there exists Parts configured for the Substitute Group present for the selected Part and parts present in the Substitute Group is available.
If there is no items present for the Substitute Group or the Parts present for the Substitute group is not available, then system will display the option By Part as selected with the list of parts configured as Type By Part in the Items window, if the parts configured does have availability.