
Pick List Print
Reference No: 24099
(V 02.00.07-00)
Details
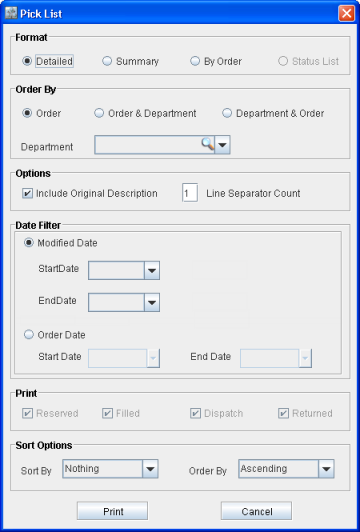
In CR2, you will be able to print a Pick List, for Rental Orders in the Contract status, by using this feature. A Pick List is a list that helps to ensure that the items present in an order are ready to be filled. The Pick List print window will be displayed as shown in Fig 1.0 below.
Fig 1.0 Pick List Print Window
The ways in which the Pick List print window can be accessed are:
Select CR2 > Yard > File menu > Print > Pick List > Pick List.
Select CR2 > Yard > View menu > Order Fill > Pick Order > Print Pick List icon
 .
.Select CR2 > Yard > Search menu > Orders > Print Pick List icon .
Select CR2 > Account > Search Orders > Orders > Print Pick List icon.
Note: The Contract Print Options window, for printing Equipment Delivery Print, can be accessed from the system in the following ways:
Select CR2 > Yard > File menu > Print > Pick List > Equipment Delivery Receipt.
Select CR2 > Yard > View menu > Order Fill > Pick Order > Equipment Delivery Receipt icon
 .
.Select CR2 > Yard > Search menu > Orders > Equipment Delivery Receipt icon.
Select CR2 > Account > Search Orders > Orders > Equipment Delivery Receipt icon.
Fields in Pick List Print Window
Field Names | Functionality |
Format |
|
Detailed | If selected, prints each item ordered on a separate line. Items with multiple quantities will not be grouped together but will be printed in separate lines. |
Summary | Prints total quantity of an ordered item on a single line. |
By Order | Print items by order number, from lowest to highest. |
Order By |
|
Order | Selecting this option will sort the print by order ids. |
Order & Department | Select this option to print pick list of an order for a particular department. Use Department drop-down list to select a department. |
Department & Order | Select this option to print pick list of a department for a particular order. Use Department drop-down list to select a department. |
Department | |
Import Button | Clicking on the importable button opens the Department Group window where one or more departments can be selected. |
Drop-down list | Use the importable button first to add departments to the drop-down list. Use the drop-down list to select a department to print a pick list only for that department. |
Options |
|
Include Original Description | Select this to print the original description of the item (as present in the item edit window) in the print generated. If the option is not checked the system will print the current description. |
Line Seperator Count | This can be used to insert blank lines between the lines that are displayed in the Pick List print. For example, if the value is defined as 2, then two blank lines will be inserted after each line in the print generated. |
Date Filter |
|
Modified Date | Select this to print pick list for items within an order depending on the date and time they were modified. This filter is applicable for orders which were modified at least once after their pick list was printed.
|
Start Date | Select a date from the provided list of dates, on which the order was ever modified. If specified alone, all items within the order that were modified after this date will get printed. If End Date is also specified then all the items within the order that were modified within the time range as specified by Start and End dates will get printed. |
End Date | Select a date from the provided list of dates, on which the order was ever modified. If specified alone, items within the order that were modified before this date will get printed. If Start Date is also specified then all the items within the order that were modified within the time range as specified by Start and End dates will get printed. |
Order Date | Select this to print pick list of all the items within the order. |
Start Date | This field should be populated with the order Start Date. |
End Date | This field should be populated with the order End Date. |
| |
Reserved | Select this to print only the reserved order lines. |
Filled | Select this to print only the filled order lines. |
Dispatch | Select this to print only the dispatched order lines. |
Returned | Select this to print only the returned order lines. |
Sort Options |
|
Sort By | Select this to sort the pick list by either Product ID, Description, Department or Bin Number. |
Order By | Select this to order the sorted list elements in either the ascending or descending order. |
|
|
Print Button | Click on this button to print the Pick List. |
Cancel | Click on this button to close the Pick List Print window without printing the Pick List. |
If an order line is deleted from an order, then the following scenarios arise while taking its Pick List print:
Pick List print taken with no date selected - The deleted line will also be present in the print for the first time alone. The description of the deleted line will have the message " *deleted* " appended to it.
Pick List print taken by selecting the date when the order line was deleted (modified date) - The deleted line will also be present in the print. The description of the deleted line will have the message " *deleted* " appended to it.