
CR2 on Oracle Thin Driver
Reference: 22889
(V 02.00.04-00)
Details
Earlier to Version 02.00.04-00, CR2 could communicate to its database only with the usage of ODBC. Now, with effect to version 02.00.04-00 CR2 can communicate to its Database through either JDBC:ODBC Drvier or using Oracle Thin Driver. Better performance of Cr2 can be achieved with Oracle Thin Driver used for communicating Cr2 to its database.
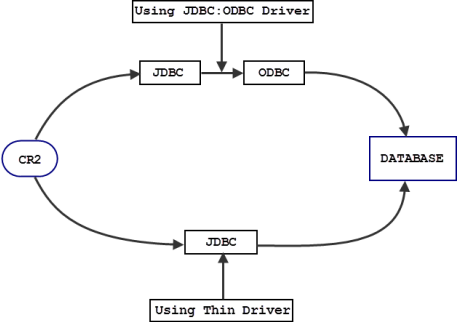
Below mentioned are the details of the setup required when JDBC:ODBC Drivers and Thin Driver used:
Setup Required for communicating CR2 to its Database using Thin Driver
Pre-requisite
In r2.ini file of Mantra folder, set the Parameters mentioned below:
URL=jdbc:oracle:thin:@<ip address of Oracle server>:<port of communication>:<SID as in server> Example : URL=jdbc:oracle:thin:@192.168.7.89:1521:R2SERVICE DRIVER=oracle.jdbc.driver.OracleDriver |
URL Parameter Information
Note : The parameter URL [URL=jdbc:odbc:<SID>] should not be present in r2.ini, if Oracle Thin Driver method is used by CR2 .
IP address of the Oracle server: Refers to the IP address of the Server or the Name of the Server, here user has to enter the IP address of the Server Computer in which CR2 database is installed.
Port Number: The Port in which the Service is running.
SID: Refers to the CR2 Database Unique Name, i.e. the Database to which CR2 has to connect to. The Unique Name of the Database can be found by running a query in SQL prompt as: SQL> select db_unique_name from v$database;
With the above mentioned parameters defined in r2.ini user will be able to work with the CR2 modules Account, Maintenance, Warehouse, Invoicing, Service, Security, Configuration, My Activity and Standard Reports. However CR2 Custom Report will not work with the above mentioned setup.
For CR2 Custom Reports module to work, installation of Oracle Driver and DSN setup is required in addition to the above mentioned setup. The Oracle Driver can be obtained by installing a Licensed version of Oracle Client or installing a free ware Oracle Express Edition which can be downloaded from the following path: http://www.oracle.com/technology/software/products/database/xe/htdocs/102xewinsoft.html
Note: A valid Oracle User Name and Password is required to download the installation from this location.
The user can also contact CR2 Support for acquiring the same.
Through Net Configuration Assistant of the Oracle installed (Licensed Version of Oracle Client / Oracle Express Edition), configure a Local Net Service Name with Service Name same as the Unique Database Name and Net Service Name . Once the Net Configuration is complete, the details of the configuration will be updated in the Tnsnames.ora file of Oracle Database.
DSN setup for Oracle installed (Licensed Version of Oracle Client / Oracle Express Edition) in windows client has to be done through Control Panel > Administrative tools > Data Sources (ODBC). Refer the below illustration for configuring DSN:
Notes:
If any of the CR2 versions, the DSN should be created with the same name as the Unique Database Name defined for the database while installation i.e., You can’t have different alias name in DSN set up.
If any of the CR2 Version, the DSN name can be custom defined i.e., the name defined can be different from the Unique Database Name defined for the database while installation. When the DSN name is not the same as Unique Database Name, then in R2.ini file the following parameter needs to be added: DSN=<Data Source Name created with Oracle installation (Licensed Version of Oracle Client / Oracle Express Edition). Even if R2.ini does not have this DSN parameter defined, CR2 Custom Reports module will still work provided the DSN Name created with Oracle installation (Licensed Version of Oracle Client / Oracle Express Edition).
DSN Setup with Oracle Xpress Edition ODBC Driver
Step 1
Access ODBC Administrator
Start → Settings → Control Panel → Administrative Tools → ODBC Data Source
The ODBC Data Source Administrator dialog box will be displayed as below.
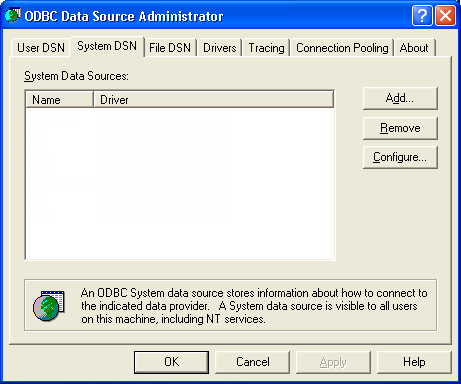
Click System DSN tab and click Add.
Note: If you select the User DSN tab, the data source will only be visible to the corresponding user.
Step 2
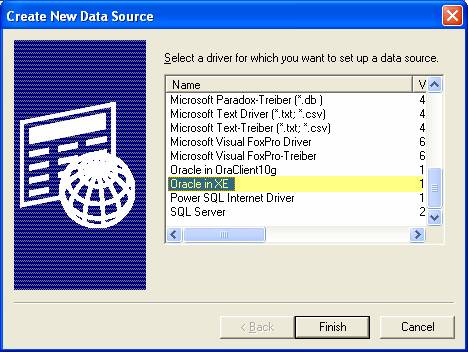
Create New Data Source dialog box appears. Select the driver from the list box as shown below (Oracle in XE ODBC Driver), click Finish.
Step 3
Oracle ODBC Driver Configuration dialog box appears as shown below.
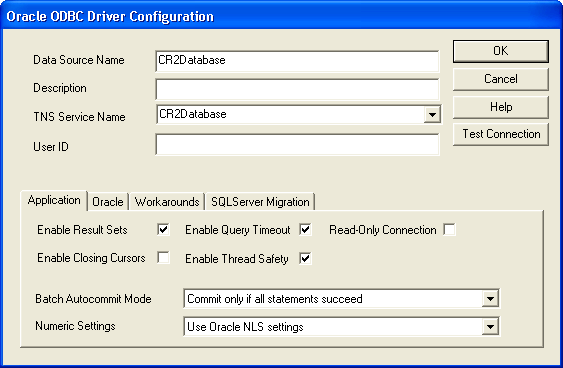
TNS Names or Service Names defined in Tnsnames.ora file of Oracle Database will be listed in the TNS Service Name field, select the appropriate Service Name.
Enter server name in text boxes provided for Data Source Name and Service Name g do not change the selected check boxes for options g select the check box for Disable MTS Support g click OK.
Note: The DSN Name created with Oracle installation (Licensed Version of Oracle Client / Oracle Express Edition) can differ from Unique Database Name. For more details refer to the Note above.
Step 4
The server gets listed in the System DSN tab as shown below g click OK.
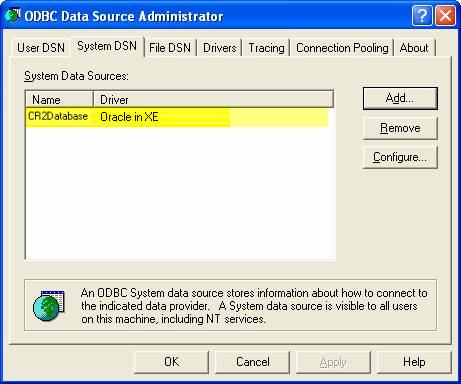
Follow similar procedure for adding other servers. After adding servers, please verify whether they are configured or not.
DSN Setup with Licensed Version of Oracle Client
Illustration of DSN setup with Oracle 10g
Step 1
Access ODBC Administrator. (Start g Settings g Control Panel g Administrative Tools g ODBC Data Source)
The ODBC Data Source Administrator dialog box will be displayed as below.
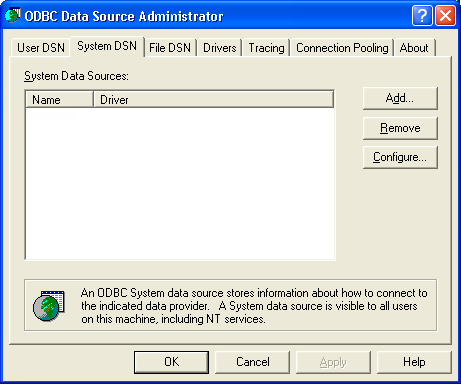
Click System DSN tab and click Add.
Note: If you select the User DSN tab, the data source will only be visible to the corresponding user.
Step 2
Create New Data Source dialog box appears. Select the required oracle driver from the list box as shown below, click Finish.
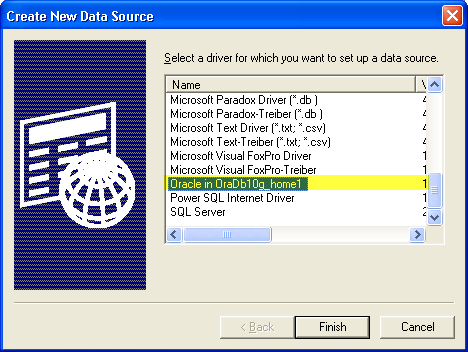
Step 3
Oracle ODBC Driver Configuration dialog box appears as shown below.
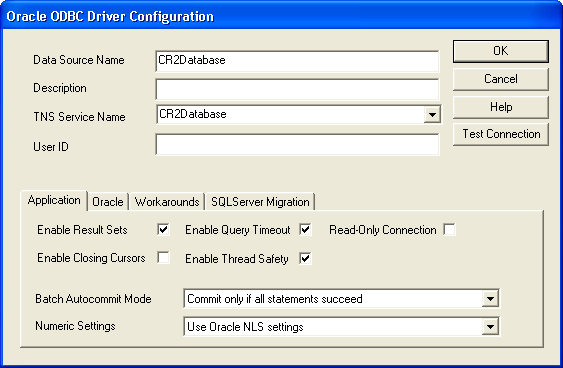
TNS Names or Service Names defined in Tnsnames.ora file of Oracle Database will be listed in the TNS Service Name field, select the appropriate Service Name.
Enter server name in text boxes provided for Data Source Name and Service Name g do not change the selected check boxes for options g select the check box for Disable MTS Support g click OK.
Note: The DSN Name created with Oracle installation (Licensed Version of Oracle Client / Oracle Express Edition) can differ from Unique Database Name. For more details refer to the Note above.
Step 4
The server gets listed in the System DSN tab as shown below click OK.
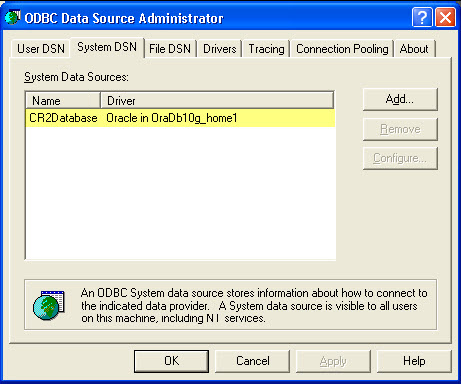
Follow similar procedure for adding other servers. After adding servers, please verify whether they are configured or not.
CR2 communicating to its Database using ODBC Driver
In order for CR2 Client to communicate with its Database through the usage of ODBC driver, the following procedure is required.
Installation of Oracle Client
Installation of CR2 Client
Needs to have the server details in the file ’Tnsnames.ora’ of oracle client (can be found in the path where oracle installed- Oracle Installation \ Network \ Admin). This can also be done by using Net Configuration Assistant of oracle client installed.
This is required for connecting Oracle Client to its Server Database. (The Tnsnames.ora file should have valid Database Server Address and service names in the format oracle can understand). For more details on this contact system administrator or CR2 support.
Define DSN, through Control Panel > Administrative tools > Data Sources (ODBC).
This is required for CR2 Client to communicate with the Database server through ODBC.
In R2.ini, the following definition line should be added : URL=jdbc:odbc:<SID>