
Not-Available Parts/Equipment
Reference: 20957
(V 01.00.94-00)
Table of Contents
Assigning Not-Available Parts and Equipment
Details
Earlier to version 01.00.94-00, on adding Not-Available Parts/Equipments to an Order, system would prompt the Parts Not-Available dialog. With effect to version 01.00.94-00, on adding Not-Available Parts/Equipments to an Order the functionality will be as explained below:
After adding all the Parts/Equipments to an Order (all types of orders), if some or all of the system will prompt a message "Some of the items are not available. Do you want to Assign?” as shown in Figure 1.0.
Figure 1.0
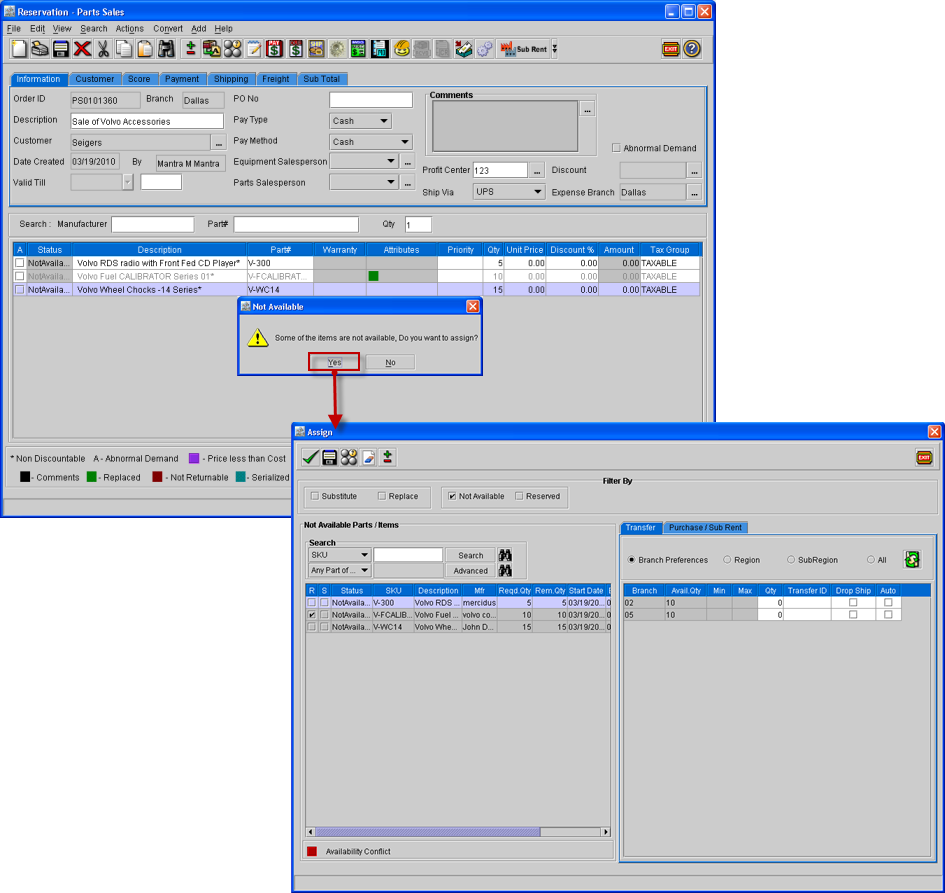
On selecting Yes to in this message dialog, system will display the Assign dialog, wherein the Not-Available items can be assigned to either Transfer Order/Purchase Order or it can be either Substituted/Replaced. However, the Assign dialog will not be displayed if all the Parts/Equipment in the Order are reserved.
Prerequisite
Not-Available lines in the Assign dialog can be assigned to an existing Transfer Order/ Purchase Order only if the option "Use existing TO/PO” is selected in Defaults module g Accounts g Orders g General g Allow section as shown in Figure 1.1.
Figure 1.1
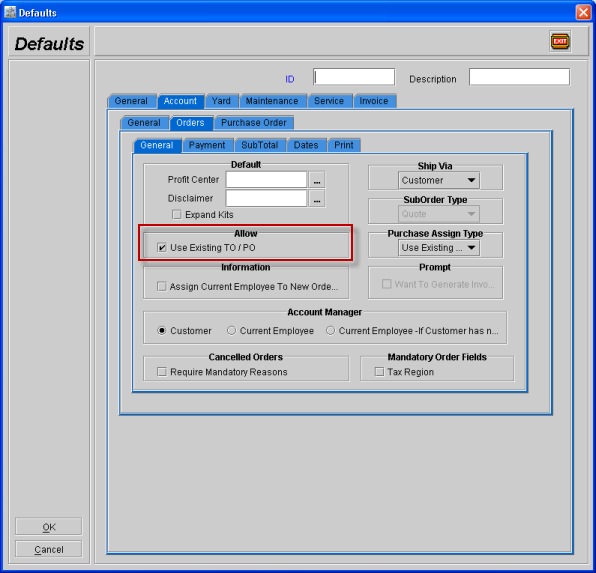
If "Use existing TO/PO” is not selected, then system will not allow assigning the lines to an Existing Transfer Order/Purchase Order
Accessing Assign dialog from different locations in CR2
The Assign dialog can be accessed from different locations from within an Order as listed below, in case the Not Available dialog is not displayed or you want to assign the Not-Available parts later on re-visiting the Order.
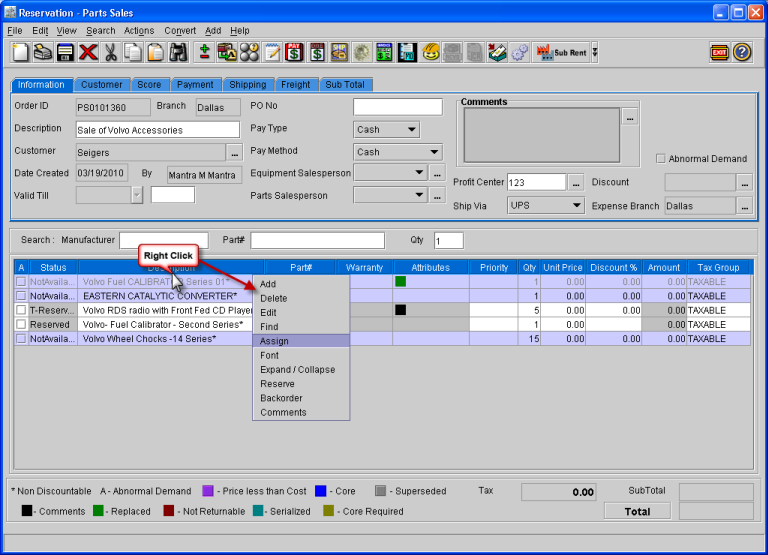
From the Right Click options menu. The Assign dialog can be accessed from the Order by selecting a single line or multiple line and then right clicking on it and selecting the Assign option from the Right click menu options as shown in Figure 1.2. This will display the Assign dialog with the selected Not - Available lines listed.
Figure 1.2
Using the Assign option available in menu options Action → Assign. The Assign dialog can be accessed from the Order through the menu options Action g Assign as shown in Figure 1.4.
Figure 1.4
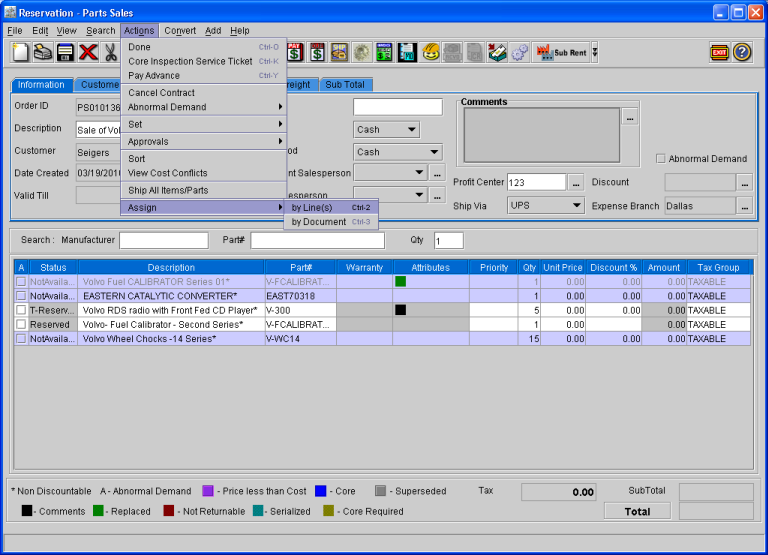
On selecting By Line is selected or the hot keys ALT + L is used, the Assign dialog will be displayed with the Not - Available line selected in the Order. If By Document is selected or the hot keys ALT + B is used, then Assign dialog will be displayed with all the Not - Available lines present in the Order.
Features and Functionality of Assign dialog
The Assign dialog is used to view all the Not-Available Parts/Equipments in the Order which is not linked to an Transfer / Purchase Order. The same can also be assigned to either Transfer Order/Purchase Order or it can be either Substituted / Replaced using the different options available in the Assign dialog refer Figure 1.0.
Figure 1.5
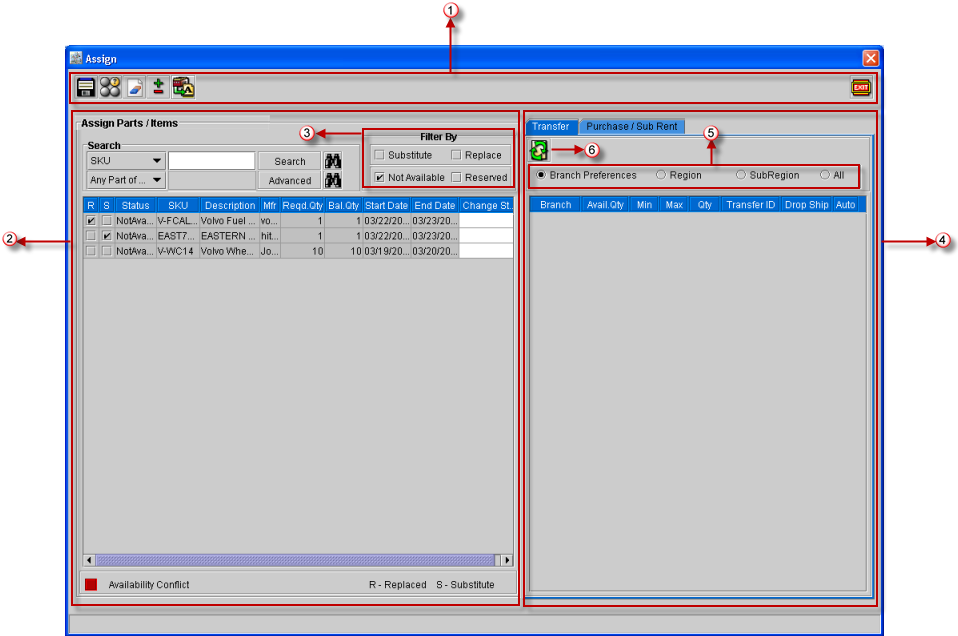
By default when the Assign dialog is accessed the lines with the following status Not-Available / Transfer / Purchase will be displayed.
In the Assign Parts / Items section of Assign dialog, the Not-Available lines in a Work Order which belong to a segment will be displayed along with the Segment header. However, no Assign operations can be performed on the Segment Header it is displayed only to indicate that the line belongs to a Segment header.
Lines can be assigned to a Purchase Or Transfer Order only if the Change Status is not updated and it is not Substituted and Replaced. However, on clearing the line, it can be assigned to Purchase Or Transfer Order.
With Reference to Figure 1.5
Icons- The icons in the Assign dialog, enables you complete the Assign Operation, for more details click here
Assign Parts / Items section: Both Reserved and Not-Available parts can be viewed. However, by default only the Parts/Equipments having status of Not-Available/ Purchase / Transfer will be displayed when the dialog is opened.
A line which is not assigned or whose Change Status is not edited or lines which are not substituted or replaced can be split using the Split feature in the right click menu options of the line. System will display the split dialog wherein you can specify the quantity and split the line.
Not-Available Parts/Equipments can be Substituted/Replaced in this section. For more details on Substituting or Replacing Parts/Equipments click here
Filter By: Will help you filter the Parts/Equipments in the Not Available Parts/Items section using the options Substitute / Replace / Not-Available/ Reserved.
Transfer and Purchase / Sub Rent section: This section will allow you to assign the not-available Parts/Equipments to either New / Existing Transfer Order/Purchase Order. For more details read Assigning lines to a Transfer Order and Assigning lines to a Purchase Order.
Filter options in Transfer tab of Transfer and Purchase / Sub Rent section: This filter option allows you to filter the results in the Transfer tab grid as per the availability of Parts/Equipments in Branch Preference or a particular Region/Sub Region or All Sites.
Refresh: Clicking on this icon will refresh the grid and display the results in the Transfer tab grid as per the selection of the filter options present in the Transfer tab of Transfer and Purchase / Sub Rent section.
Table 1.0 Filter Options
Filter | Value |
Substitute | When Substitute is selected, system will list out only the Reserved/ Not available (Based on Reserved and Not-available filters) Parts/Equipments which can be substituted. If this is de-selected, then system will list out Reserved/ Not available (Based on Reserved and Not-available filters)Parts/Equipments which cannot be substituted. By default Substitute filter will not be selected. |
Replace | When Replace is selected, system will list out only the Reserved/ Not available (Based on Reserved and Not-available filters) Parts/Equipments which can be replaced. If this is de-selected, then system will list out Reserved/ Not available (Based on Reserved and Not-available filters) Parts/Equipments which cannot be replaced. By default Replace filter will not be selected. |
Not-Available | When Not-Available is selected, then system will list out only the Not-Available Parts/Equipments in the Order which can be either Replaced / Substituted. By default when the window opens Not-available check box will be selected. |
Reserved | When Reserved is selected, then system will list out only the Reserved Parts/Equipments in the Order which can be either Replaced / Substituted or not. By default Reserved filter will not be selected. |
More Information on the Filter Options:
If both Substitute and Replace are selected, then system will list out Parts/Equipments which can be substituted and also replaced.
When both Not-Available and Reserved are selected, system will list out Parts/Equipments which are of status not-available and reserved.
Based on the selection of these four filters, Parts/Equipments lines in the Order will be displayed in the Not Available Parts/Items grid.
Illustration
If Substitute and Not-Available is selected
Then system will refresh the gird to list the Not-Available Parts/Equipments in the Order which can be substituted.
If Reserved and Replace is selected.
Then system will refresh the grid to list the Reserved Parts/Equipments in the Order which can be replaced.
Similarly different combinations of the above mentioned filters can be selected to view the Parts/Equipments in the Assign Parts/Items section of Assign dialog.
Icon Information
Icon | Description |
| Clicking on the Save icon, will save the changes made like assigning the Parts/Equipments to the respective Purchase Order / Transfer Order and refresh the grid to display the Parts/Equipments based on the Search Criteria and the Filter By options. |
| Selecting a line and clicking on the Availability icon, will display the availability of the selected equipment/part in the current Branch. |
| Clicking on the Clear icon, will clear all the lines which are assigned (Substitute/Replace/Transfer/Purchase). However, if the Assigned lines are saved then it cannot be cleared. |
| Clicking on the Expand/Collapse icon, will Expand or Collapse the lines in the Assign Parts/Items section of Assign dialog. |
| Clicking on the Assign icon, will display the Auto Assign dialog with options By Maximum Qty available and By maximum Parts/Items available.
Part 1 (required qty = 5)--- SiteA 5 SiteB 6 SiteC 7 Part 2 (required qty = 6)--- SiteA 4 SiteB 5 SiteC 6 Part 3 (required qty = 7)--- SiteA 6 SiteB 7 SiteC 8 Then on selecting above 3 lines and Auto Assigning by max parts available will assign the qty as below
In the above example, SiteC has the entire qty available for all the lines (most lines available) so the qty is assigned automatically to C. Assume that if no site satisfies all 3 lines , then it will check for the sites which has 2 lines available and so on.
|


