
How to Add an Item
All items are given a Product ID and can be any of two types, Serial or Non-serial
Serial items are tracked separately by asset ID numbers. The asset ID represents a barcode affixed to the asset for tracking. Barcodes allow the use of scanning devices for easy checking in/out and tracking. Service, usage and status history is tracked at the individual asset level (if the Service module is available).
Non-serial items are not tracked individually. These items are tracked by Product ID (which can be scanned) and the quantity amount only. Service, usage and status history is tracked only at the quantity level. For example if five non-serial items of the same product ID are marked as damaged, the item history will only display a quantity of five as being damaged without indicating which five.
To create a new item
From the main screen, go to Maintenance > Items.
Click the Add button  in the tool bar
The Item Edit screen appears.
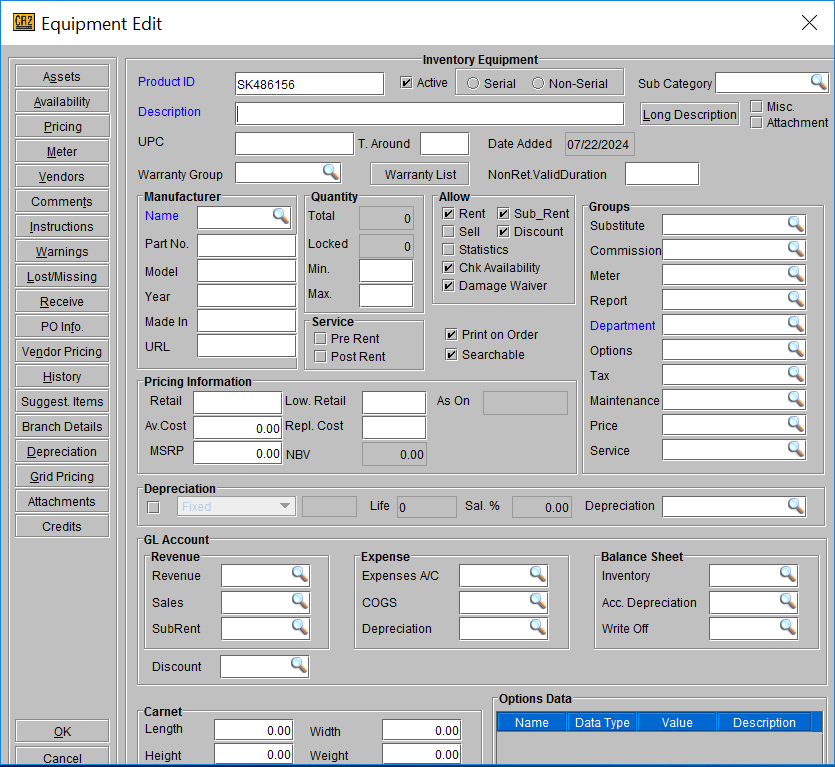
The Product ID will be auto assigned but can be overridden (up to 22 characters).
Alternatively, from the Account module, go to Search → Items and click on the new icon 
Note: A barcode will be used as Product IDs in the case of non-serial items Enter the description of the item in the Description field (up to 100 characters) Select the Serial option if the item will have assets tracked separately
Select the Non-Serial option if the items will be tracked by quantity only Enter Keywords (separated by commas)
Enter a Subcategory (check “How to Add Subcategory”)
Note: all attributes of a subcategory will be inherited by the item making the entry of some fields below unnecessary
Enter the Manufacturer Name, Part #, Model, Made In (origin)
In the case of expendables, uncheck the Rent check box and check the Sell
In the case of an item where it is not necessary to know an exact stock, uncheck the Chk Availability box.
In the case of an item where it is possible to subrent, check the Sub Rent box
In the case of an item where it is necessary to track revenue statistics, check the Statistics box Enter a Retail Price (price to be used in case the item is sold)
Enter a replacement cost Enter an Availability group
Enter an Exchange group (items must be of the same type (serial vs non-serial)) Enter a Report group
Enter a Department group
Enter the weight, height, length and width if applicable Enter corresponding GL Accounts
Enter Pricing (Daily for rentals, Each for sales)
Enter Allowed Sites if required (to be to show inventory only at a particular site)
To enter Comments for the item click the Comments button. This field will be used to indicate inventory problems such as empty boxes.
To enter Instructions for the item click the Instructions button.
Enter Warnings if item comes with accessories ie power supply, cables, etc Enter Vendor Pricing information (daily for subrentals, each for purchase) Enter suggested items
Click on All Sites Details and enter the Shelf Location which represents a particular section of shelving and enter the Bin Number which represents the actual shelf.
Enter shelf/bin information on All Site Details Select Depreciation group
Enter pictures through the View Image button
After the item has been created the assets for serial items and the quantities for the non-serial items will be received thru Receive button. Therefore, at this point the item stock will be zero.