
Posting Cash Payments
Reference No: 24861
(V 02.00.14-00)
Details
In CR2, you'll now be able to post the Cash payments and Advance payments made in CR2 into your Accounting Software in the Quick Books format. Two files get generated named as Customer.csv and Payments.txt.
Customers.csv File Details
The Customers.csv file will be in the existing standard format and will contain details of the customers from whom payments have been received. There is no change to this file.
Payments.txt File Details
The Payments.txt file will now contain the details regarding the Cash payments made, in addition to that of the Advance payments. Each payment made will have a corresponding record in this file. The various columns within the Payments.txt file are:
Table 1.0 Column Details of Payments.txt File
Column Name | Description |
Customer ID | The Customer ID of the Customer who made the payment. |
Reference | The Payment ID. |
Date | The date when the payment was made. |
Payment Method | Mode of payment. For example, Card, Cash and so on. |
Cash Account | The GL Code as defined within Configuration module > Payment Setup > GL Code. |
Cash Amount | The amount that is paid (payment amount). For example, 200$. |
Prepayment |
|
Number of Distributions | Will always be entered as ’r;1’. |
Invoice Paid |
|
G/L Account | Blank. |
Amount | Negated value of Cash Amount. For example if Cash Amount = 200 then Amount = -200. |
Receipt Number | Order ID. |
Changes in Payment List Window
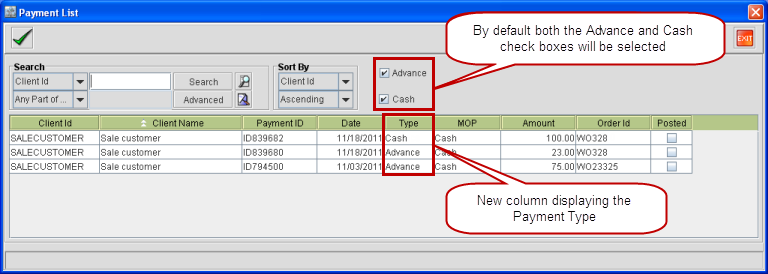
The important changes made to the Payment List window, as shown in Figure 1.0, are:
Two new check boxes named Advance and Cash are added.
By default, both the Advance and Cash check boxes will be selected. Thus when the Payment List window is accessed, it will display all the Advance and Cash payments by default.
In the Payment List window a new column named Type is added which will display the type payment listed.
Figure 1.0 Changes in Payment List Window
Sample Workflow
Given below is a sample workflow.
Prerequisites:
Create an Order with Total as 1000$.
Make an Advance payment of 100$.
Make a Cash payment of 900$.
Invoice the Order.
Posting the Payments Batch
Steps for posting the Payments Batch are:
Open the Invoicing module > Payments tab.
Click the New icon. This opens up the Payments Batch window.
Enter a suitable Batch Name and click the Add icon. This opens up the Payment List window, which lists all the Cash payments and Advance payments which are yet to be posted.
Double-click on these to add them to this Payments Batch.
Click the Select icon.
Click the Exit icon.
Select the newly created Payments Batch and select Actions menu > Post Batch. This opens up the Post Batch screen.
Enter a suitable path in the Export File field and select the Create Files in Folder check box.
Select the Payment Format as Quick Books and press the OK button.
This posts the Payments Batch in the Quick Books format. Two files get generated named as Customer.csv and Payments.txt as described above. The generated Payments.txt file is as shown in figure 1.1.
Figure 1.1 Payments.txt File
