
Linked Service Work Orders
Reference No: 24295
(V 02.00.10-00)
Segments are removed from the Service Work Orders. Instead a new functionality called linking of Service Work Orders is introduced.
The change in functionality of the Service Work Orders due to linking are:
Linked Service Work Orders do not have segments within them.
A Linked Service Work Order can be charged to only one person which could either be a customer, warranty, or internal based on the selection within the Charge To field in the Main Tab of the Service Work Order's edit window.
If Customer is selected within the Charge To field then the Service Work Order gets charged to the customer, who is tagged to the Work Order using the Customer field in the Main tab or the Customer tab.
If Warranty is selected within the Charge To field, then the Claim Details section within the Customer tab becomes enabled and the required information can be entered there.
If Internal is selected within the Charge To field, the current branch is by default selected within the Main tab > Customer field. Clicking on the import button there displays the Branches search window allowing you to tag a different branch, if need be.
A Service Work Order can have multiple Service Work Orders linked to it and they are termed as Linked Service Work Orders.
The Service Work Order from where another Linked Service Work Order is created initially, acts as the parent for the newly created Linked Service Work Order (child).
The ID of the newly created Linked Service Work Order is generated by adding a numerical suffix to the ID of its parent Service Work Order. The Linked Service Work Orders of a parent Service Work Order can be considered as its children.
For example, say there is a Service Work Order with ID WO321. A new Linked Service Work Order is created from within WO321. The newly created Linked Service Work Order will have its ID as WO321-1. Here the Service Work Order WO321 is the parent WO and WO321-1 is its child, linked to it.
The following fields of the child Linked Service Work Order will get defaulted from the respective entries within the parent Linked Service Work Order:
Within the Main tab - Customer, Charge To, Category, Service Type and Auth. Limit (Authorized Limit) fields.
Within the Equipment tab - Equipment details field.
Within the Defaults/Taxes tab - Profit Center and Destination fields.
If a new Linked Service Work Order (second child) is created from within one of the already Linked Service Work Orders (child) then it gets created as the child of its parent Service Work Order. The above mentioned fields get defaulted from the settings in the parent Linked Service Work Order.
For example, say there is a Service Work Order with ID WO321 which has a child Linked Service Work Order to it with ID WO321-1. If a new Linked Work Order is created from within WO321-1, it will get created as the child of WO321 and will hence have its ID as WO321-2. The above mentioned fields within both the child Linked Service Work Orders WO321-1 and WO321-2 will get defaulted from their respective settings in the parent Linked Service Work Order WO321.
A new tab named Linked Order(s) is provided within the Service Work Order edit window, as shown in the following figure Figure 1.0. This tab displays all the Service Work Orders linked to this Service Work Order including the parent Service Work Order.
Figure 1.0 Linked Order(s) Tab
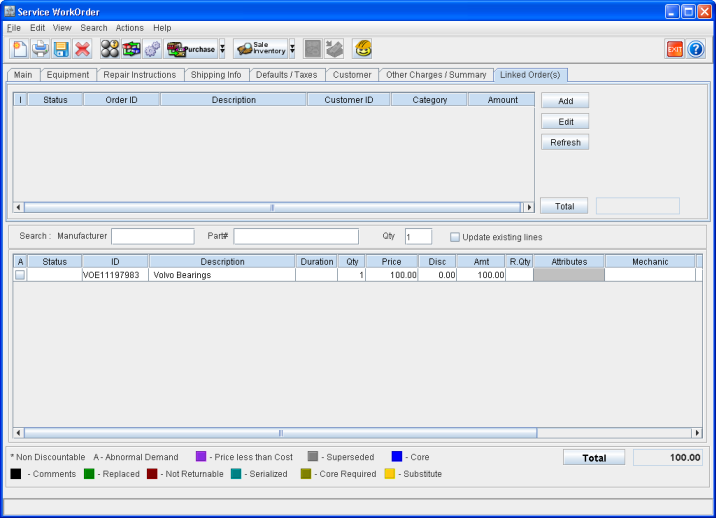
For example, say there exists three Service Work Orders named WO321, WO321-1, and WO321-2 as described in the preceding example. In this case the Linked Order(s) tab will display the Linked Service Work Orders as shown in the Table 1.0.
Table 1.0
Displayed in the Linked Order(s) Tab of the Service Work Order | Linked Service Work Orders Displayed |
WO321 | WO321-1, WO321-1 |
WO321-1 | WO321, WO321-2 |
W0321-2 | WO321, WO321-1 |
The Linked Order(s) tab can be used to:
Add new Linked Service Work Orders to this Order - by using the Add button.
Edit existing Linked Service Work Orders displayed there - by using the Edit button or by double-clicking on any of the listed orders.
The Total field within the Linked Order(s) tab displays the sum total of the amounts (Service Work Order Totals) from all the Linked Service Work Orders which are displayed in the tab.
The Refresh button refreshes the data regarding the Linked Service Work Orders listed in the Linked Order(s) tab. It also refreshes the amount displayed within the Total field.
Check boxes are provided, under the column named " I ", corresponding to each Linked Order listed in the Linked Order(s) tab. If the check box is selected for a particular Linked Service Work Order then that will also get invoiced along with the currently open Linked Service Work Order, when invoicing is done.
Note: If the pre-requisite conditions for invoicing are not met by any of the listed Linked Service Work Orders then an appropriate prompt will be displayed by the system. The check box won't be allowed to be checked till all the pre-requisites for invoicing are met within that listed linked Service Work Order.
If the invoices of the Service Work Orders displayed in the Linked Order(s) tab are posted, the system will display the work order details with font color as gray.
For the Linked Service Work Orders having posted invoices, the system will not allow to select or de-select the " I " check box.
When a Linked Service Work Order is about to be invoiced (by pressing the Done icon) the Work Order Payments window will pop-up if the Defaults/Taxes tab > Pay Type is set to either Cash or Cash Only. The Payments tab will pop-up only for the Linked Service Work Order that is presently being invoiced.
New items can't be added to an already invoiced and posted Service Work Order. But you can open the Linked Order(s) tab and click on the Add button and create a new Linked Service Work Order for those items.
The parent Linked Service Work Order can't be cancelled if:
One or more of its child Linked Service Work Order's invoice is generated.
One or more of its child Linked Service Work Order's have sold or returned parts in it.
One or more of its child Linked Service Work Orders is currently kept open in the system.
One or more of its child Linked Service Work Order's Prep Task is kept open from the Yard module.
One or more of its child Linked Service Work Orders have P-Assigned items in it and the corresponding Purchase Order is kept open in another session.
When the parent Linked Service Work Order is cancelled then all the child Linked Service Work Orders linked to it will also get cancelled.
When a child Linked Service Work Order is cancelled then only that child Linked Service Work Order gets cancelled.
Instructions for printing the Linked Service Work Orders are:
Click the Print icon within a Linked Service Work Order edit window. This opens up the Form Type Options window.
Click the Print icon. This opens up the Linked Order(s) Print window. This window allows you to select the Linked Service Work Orders that needs to be printed from this Linked Service Work Order. All the Service Work Orders that are linked to this Service Work Order will be listed here.
Select the All check box to print all of the Service Work Orders linked to this Linked Service Work Order.
Note: Else the Linked Service Work Orders that needs to be printed can be selected individually by selecting their respective check boxes.
Click the Print icon, after selecting the appropriate check boxes within the Linked Order(s) Print window, to print the selected Linked Service Work Orders.
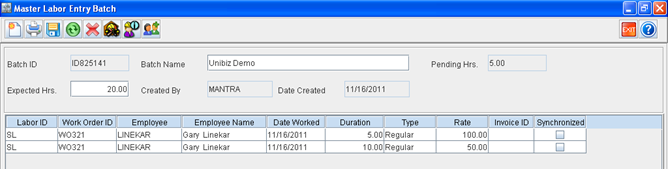
A Master Labor Entry Batch (MLE) can be created for the child Linked Service Work Orders by entering the child Linked Service Work Order's ID in the Work Order ID column as shown in the following Figure 1.1.
The Work Order ID column can be used to enter the ID of either the parent Service Work Order or of the Linked Service Work Order (child) for a MLE batch.
Synchronizing the MLE will add the Labor to that particular Linked Service Work Order.
Unsynchronizing the MLE will delete the previously added Labor from the Linked Service Work Order.
Figure 1.1 Master Labor Entry Batch Synchronized with Linked Service Work Orders
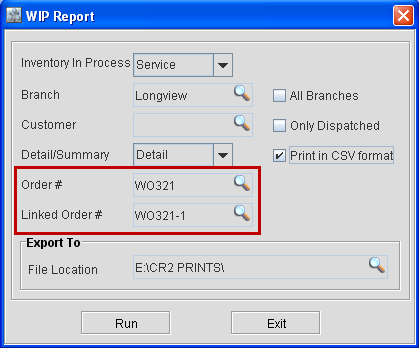
The Work in Progress (WIP) Report for the Linked Service Work Orders can be generated from CR2 > Reports > Service > WIP. This opens up the WIP Report window, as shown in the following figure Figure 1.2.
Tagging the parent Service Work Order's ID in the Order # field w0ill print the WIP Report for just the parent Linked Service Work Order.
Tagging the parent Service Work Order's ID in the Order # field and then tagging the child Linked Service Work Order's ID in the Linked Order # field will generate the WIP Report for the tagged Linked Service Work Order alone.
Figure 1.2 Generating Work in Progress Report for Linked Service Work Order (Child)
Effects on Pre-existing Service Work Orders
This new functionality, termed as Linked Service Work Orders, affects the pre-existing Service Work Orders as well. The effects on pre-existing Service Work Orders are:
The segments, and the items listed under the segments, except the segment with the lowest numerical suffix, are removed out of an existing Service Work Order.
The items that were listed within the segment with the lowest numerical suffix, gets retained within the pre-existing Service Work Order. This Service Work Order will retain its original ID.
If the segment with the lowest numerical suffix shares an invoice with any other segment in the pre-existing Service Work Order, then the items within both the segments get retained within the Service Work Order.
All the other segments, gets created as separate Service Work Orders and gets linked to the original Service Work Order. Each of these Linked Service Work Orders will have their ID generated by adding the numerical suffix of the segment, as suffix to the ID of the original Service Work Order.
If two or more of such segments share an invoice in the pre-existing Service Work Order, then the items within those segments will get created into a single new Linked Service Work Order. This new Linked Service Work Order will have its ID generated by adding the numerical suffix of the segment, with the lowest numerical suffix among them, to the ID of the original Service Work Order.
Sample Scenarios
Scenario - 1
A pre-existing Service Work Order WO111 has three segments within it, in the sequence, as shown below:
WO111
WO111-3
WO111-2
WO111-1
Of these, no segments share common invoices, then:
The segment WO111-1 will get retained in the Service Work Order with ID as WO111.
The segments WO111-2 and WO111-3 will get created into two new Linked Service Work Orders with IDs as WO111-2 and WO111-3 respectively.
The two newly created Linked Service Work Orders (WO111-2 and WO111-3) will be displayed within the Linked Order(s) tab of the Service Work Order WO111.
The parent Service Work Order (WO111) along with the other Service Work Order(s) linked to its parent will get displayed within the Linked Order(s) tab of the child Linked Service Work Orders. For example, WO111 and WO111-2 will get displayed within the Linked Order(s) tab of WO111-3.
A new Linked Service Work Order, created from either the parent or a child Linked Service Work Order, will have its ID as WO111-4. If more Linked Service Work Orders are created, they will have IDs with successive numerical suffices added to WO111 as WO111-5, WO111-6 and so on.
Scenario - 2
A pre-existing Service Work Order WO222 has its first segment deleted and now has five segments within it, in the sequence, as shown below.
WO222
WO222-6
WO222-5
WO222-4
WO222-3
WO222-2
Of these, segments 3 and 5 share a common invoice and segment 6 is open, then:
WO222 will contain the items listed within the segment WO222-2, since it is the segment with the lowest numerical suffix.
WO222-3 and WO222-5 will be moved out to form a new Linked Service Work Order with ID as WO222-3 (lowest of the two segment IDs which are moved out).
Segments WO222-4 and WO222-6 will get created into 2 new Linked Service Work Orders with IDs as WO222-4 and WO222-6 respectively.
The three newly created Linked Service Work Orders (WO222-3, WO222-4, and WO222-6) will be displayed within the Linked Order(s) tab of the Service Work Order WO222.
The parent Service Work Order (WO222), along with the other Service Work Order(s) linked to the parent, will get displayed within the Linked Order(s) tab of the child Linked Service Work Orders. For example, WO222, WO222-3, and WO111-4 will get displayed within the Linked Order(s) tab of WO222-6.
A new Linked Service Work Order, created from either the parent or a linked child Service Work Order, will have its ID as WO222-7. If more Linked Service Work Orders are created, they will have IDs with successive numerical suffices added to WO222 as WO222-8, WO222-9 and so on.
Scenario - 3
A pre-existing Service Work Order WO333 has three segments within it, in the sequence, as shown below.
WO333
WO333-3
WO333-2
WO333-1
Of these, segments 1 and 3 share a common invoice, then:
WO333 will contain the items listed within the segment WO333-1 and WO333-3, since WO333-1 is the segment with the lowest numerical suffix within the pre-existing Service Work Order.
WO333-2 will be moved out to form a new Linked Service Work Order with ID as WO333-2.
The newly created Linked Service Work Order (WO333-2) will be displayed within the Linked Order(s) tab of the Service Work Order WO333.
The parent Service Work Order (WO333) will get displayed within the Linked Order(s) tab of the child Linked Service Work Order (WO333-2).
A new Linked Service Work Order, created from either the parent or a linked child Service Work Order, will have its ID as WO333-4. If more Linked Service Work Orders are created, they will have IDs with successive numerical suffices added to WO333 as WO333-5, WO333-6 and so on.
Workflow of Linked Service Work Orders
Given below is a sample scenario of how the Linked Service Work Orders can be used in the system.
Scenario:
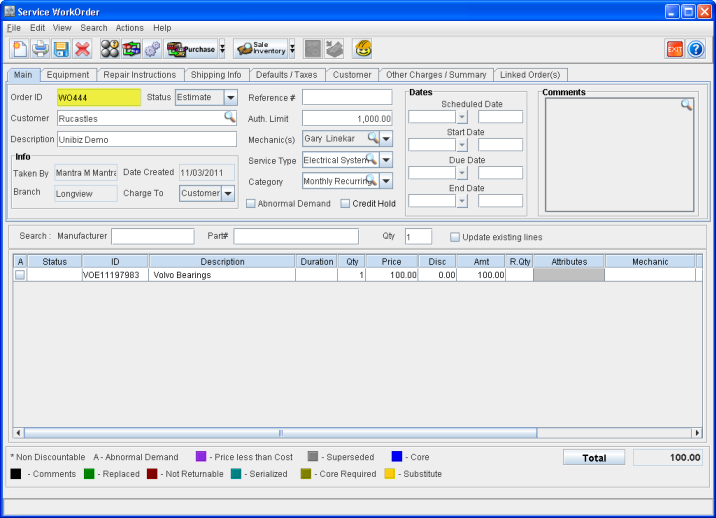
A new Service Work Order is created with ID WO444 as shown in the following figure Figure 2.0. This Service Work Order will act as the parent for any further Linked Service Work Orders created from it or from its children.
Figure 2.0 New Service Work Order Created (Parent)
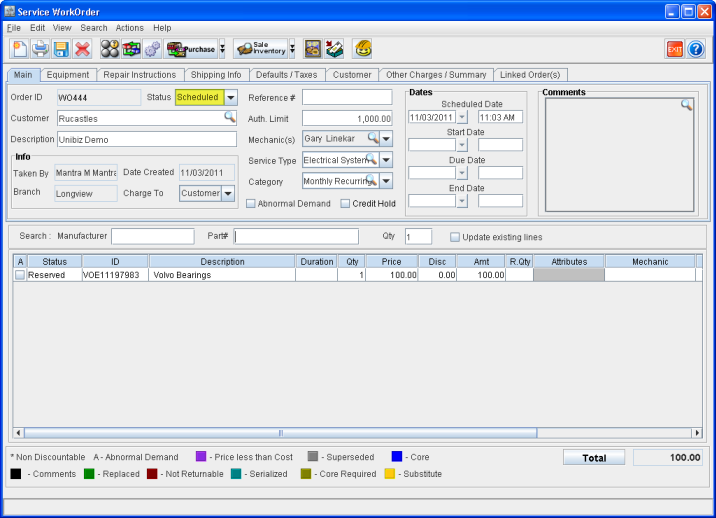
The status of the parent Service Work Order is changed to Scheduled as shown in the following figure Figure 2.1.
Figure 2.1 Status Changed to Scheduled for the Parent Service Work Order
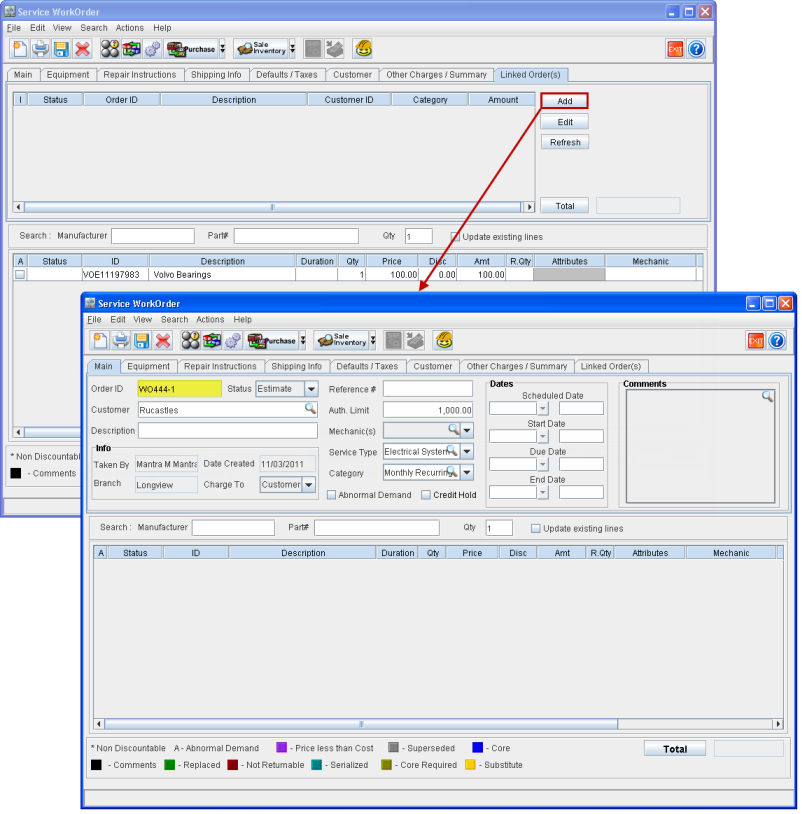
Another new Service Work Order (first child) is created from within WO444 by clicking on the Add button within the Linked Order(s) tab. This Linked Service Work Order (first child) has the ID WO444-1 as shown in the following figure Figure 2.2.
Figure 2.2 New Linked Service Work Order Created (First Child)
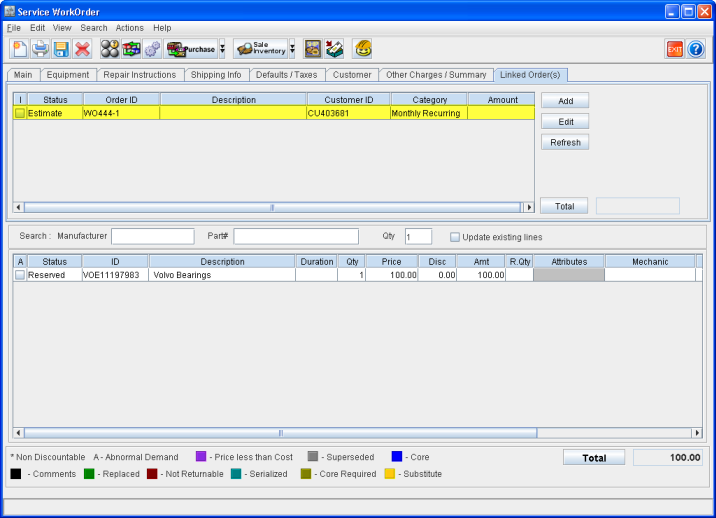
The newly created child Linked Service Work Order gets displayed within the Linked Order(s) tab of the parent Linked Service Work Order, as shown in Figure Fig 2.3.
Figure 2.3 Child Linked Service Work Order Displayed Within Linked Order(s) Tab of Parent Linked Service Work Order
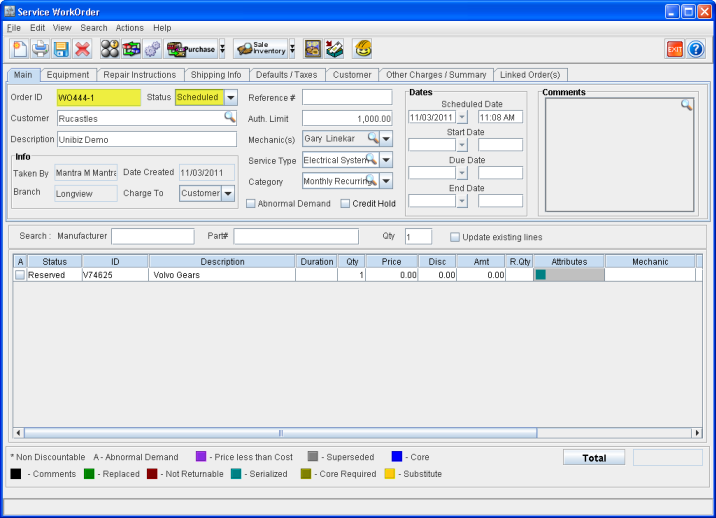
The status of the child Linked Service Work Order is changed to Scheduled as shown in Figure 2.4.
Figure 2.4 Status Changed to Scheduled for the Child Linked Service Work Order
Another new Service Work Order (second child) is created from within WO444-1 (first child), by clicking on the Add button within the Linked Order(s) tab. This Linked Service Work Order has the ID WO444-2 (since it gets created as the Linked Service Work Order of the parent Service Work Order WO444) as shown in Figure 2.5.
Figure 2.5 New Linked Service Work Order Created (Second child) from within the Linked Service Work Order (First Child)
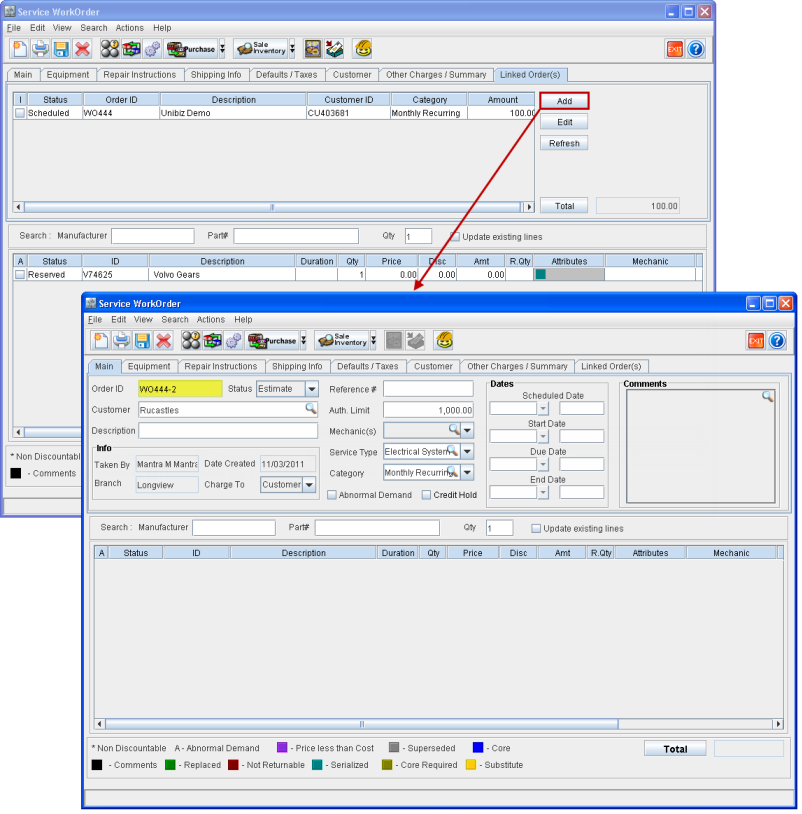
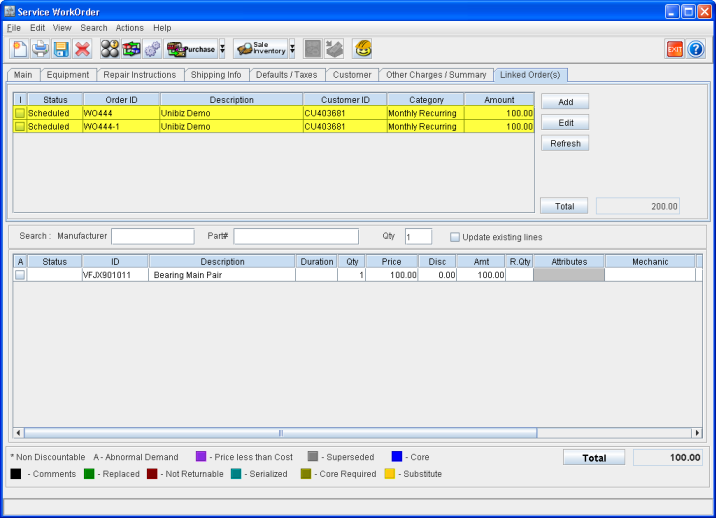
Both the Linked Service Work Orders, the parent WO444 and the child WO444-1 (first child), gets displayed within the Linked Order(s) tab of WO444-2 as shown in Figure 2.6.
Figure 2.6 Parent and First Child Linked Service Work Orders Displayed Within the Linked Order(s) Tab of the Second Child
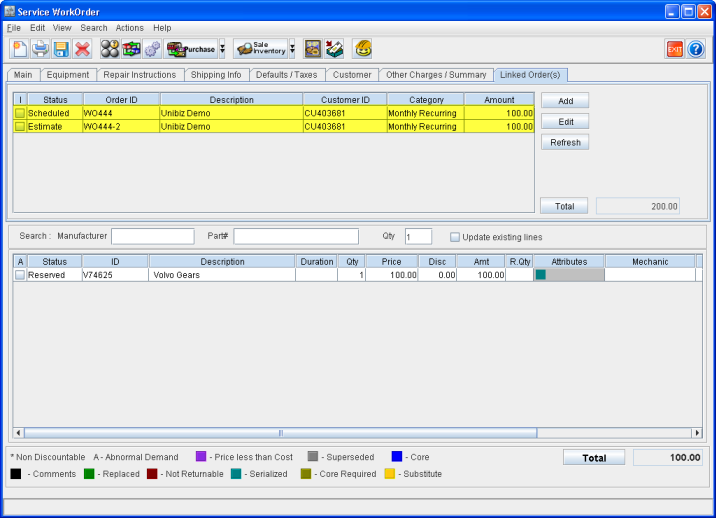
Both the Linked Service Work Orders, the parent WO444 and the second child WO444-2, gets displayed within the Linked Order(s) tab of the Linked Service Work Order WO444-1 (first child) as shown in Figure 2.7.
Figure 2.7 Parent and Second Child Linked Service Work Orders Displayed Within the Linked Order(s) Tab of First Child
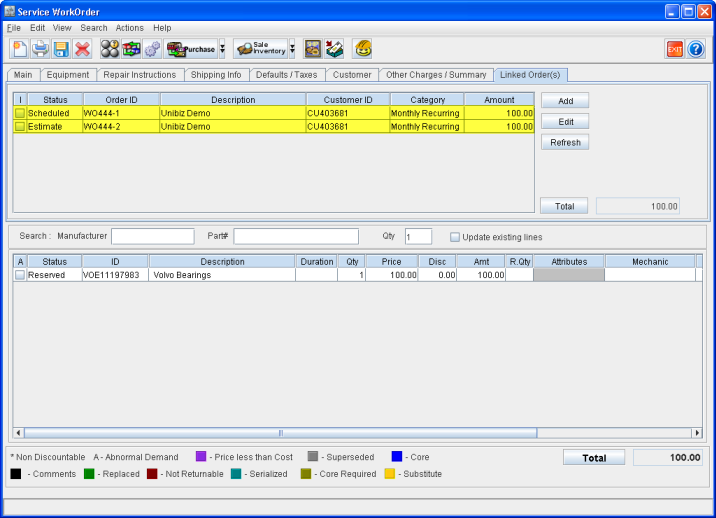
Both the child Linked Service Work Orders, WO444-1 and WO444-2, gets displayed within the Linked Order(s) tab of the parent Linked Service Work Order WO444 as shown in Figure 2.8.
Figure 2.8 Child Linked Service Work Orders Displayed Within the Linked Order(s) Tab of the Parent
Instructions to print the created Linked Service Work Orders are:
Click the Print icon within a Linked Service Work Order edit window of WO444. This opens up the Form Type Options window.
Click the Print icon. This opens up the Linked Order(s) Print window, as shown in the following figure Fig 2.9. This window allows you to select the Linked Service Work Orders that needs to be printed from this Linked Service Work Order. All the Service Work Orders that are linked to this Service Work Order will be listed here.
Select the All check box to print all of the Service Work Orders linked to this Linked Service Work Order.
Note: Else the Linked Service Work Orders that needs to be printed can be selected individually by selecting their respective check boxes.
Click the Print icon, after selecting the appropriate check boxes within the Linked Order(s) Print window, to print the selected Linked Service Work Orders.
Figure 2.9 Printing Linked Service Work Orders
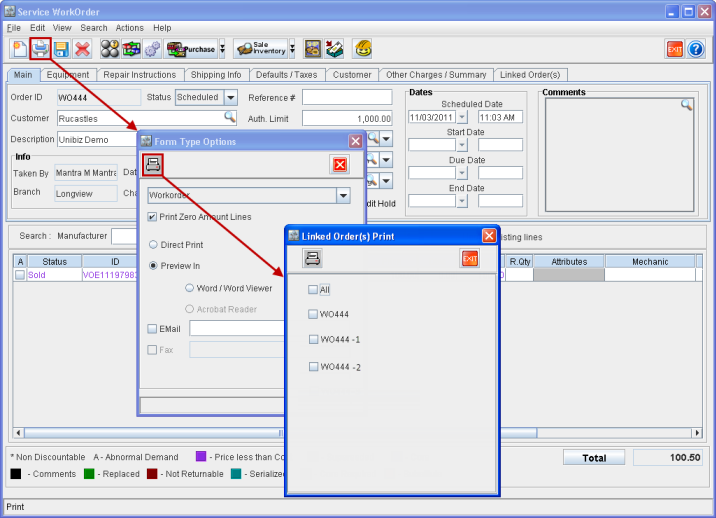
Table 1.0 Feature Revision History
Revision Number | Changes in Feature | Version | Reference ID |
1 | 02.00.09-00 | 24295 | |
2 | 02.00.10-00 | 24472 |