
Exporting Various Types of Batches in Peachtree
Reference No: 24244 24078
(V 02.00.08-00)
Details
In Cr2, you can post the following batches in the Peachtree format:
Accounts Receivable Invoice Batches.
Accounts Payable Voucher Batches.
Depreciation Batches.
NBV Adjustments Batches.
Quantity Adjustment Batches.
This can be done by selecting the option Peachtree, from the drop-down list, while posting the batches created.
Posting Accounts Receivable Invoice Batches in Peachtree Format
Instructions for posting an Accounts Receivable Invoice Batch in the Peachtree format are:
Go to CR2 > Invoicing > Receivables tab.
Click on New icon.
Enter a suitable Batch Name.
Click on Add Invoices icon.
All the invoices that are to be posted, to date, will get listed.
Search and add the Invoice that needs to be posted.
Click on OK icon.
Click on Exit icon.
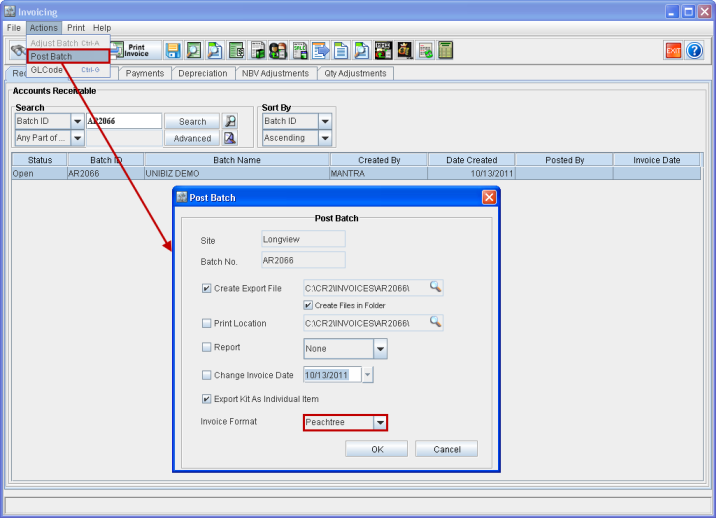
Keeping the currently created Accounts Receivable Invoice Batch selected, click on Actions menu > Post Batch.
Select Peachtree as Invoice Format within the Post Batch window that pops-up, as shown in Fig 1.0 given below.
Select Create Export File check box.
Note: The folder to which the files need to be exported can be chosen by clicking the import button present.
Figure 1.0 Posting an Accounts Receivable Invoice Batch in Peachtree Format
Click on OK button.
On posting an Accounts Receivable Invoice Batch in Peachtree format, system will generate the files named General.csv as shown in Figure 1.1.
For every transaction two entries will be created within the General.csv file as shown in Figure 1.1 given below. They are:
The first entry affecting the COGS GL account and
The second entry for the Inventory General Ledger (INV GL) account (As it is currently working in Great Plains format).
Note: COGS GL code will be formed as per COGS GL setup and INV GL will be formed as per PURCH GL setup in the Invoicing module. The details of the newly added General.csv file are given below.
Additional entries get created for Branch Transfers if Branch Transfer is done.
Additional entries get created for Depreciation if depreciation charges are present in the batch being posted.
Figure 1.1 Peachtree CSV Format File &endash; General.csv

For your reference, the Dist.txt file exported in the Great Plains format for the same Accounts Receivable Invoice Batch is also shown in Figure 1.2 and Fig 1.3.
Figure 1.2 Great Plains Format File - Dist.txt
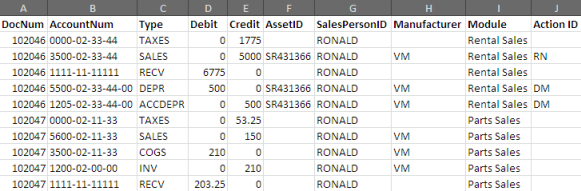
If Branch Transfers are present then an additional file named Branch Transfers.txt will also get created when AR Batches are posted in Great Plains format, as shown in Fig 1.3.
Figure 1.3 Great Plains Format File - Branch Transfers.txt

Table 1.0 General Columns in .csv
Column Name | Description |
Transaction Number | The AR Batch ID is fetched and passed on as Transaction Number. |
Transaction Date | The Transaction Date is fetched from the AR Batch and is passed on. |
Reference Number | The Invoice ID will be fetched and passed on for Cost Adjustments. |
GL Code | The Cost of Goods Sold (COGS) and Inventory General Ledger (INV GL) accounts defined in Part Edit/Item Edit window will be displayed for corresponding entries of Branch Transfers and Cost Adjustments. For Depreciation entries, the Depreciation and Accumulated Depreciation GL Codes will be fetched and passed on. |
Amount | The transaction amount is fetched and passed on as Amount. If it is a debit then it will contain a positive value and if it is a credit it will contain a negative value. |
Entity | The Customer ID or Manufacturer ID is fetched and passed on for Cost Adjustment and Branch Transfers respectively. |
Class | This column is left blank. |
Number of Transactions | The total number of transactions per invoice for which this AR Batch was created is summed up and passed on in this field. |
Description | This field passes on the type of transaction that has happened like Parts Sales (Parts Sales), Service Work Orders (Service Sales), Equipment Sales (Equip Sales), Part Branch Transfer (Part Branch Transfer), Depreciation (Depreciation), or Accumulated Depreciation (Accumulated Depreciation). |
Posting Accounts Payable Voucher Batches in Peachtree Format
Instructions for posting an Accounts Payable Voucher Batch in the Peachtree format are:
Go to CR2 > Invoicing > Payables tab.
Click on New icon.
Enter a suitable Batch Name.
Click on Add Vouchers icon.
Search and add the Purchase Order Vouchers that needs to be posted.
Click on Exit icon.
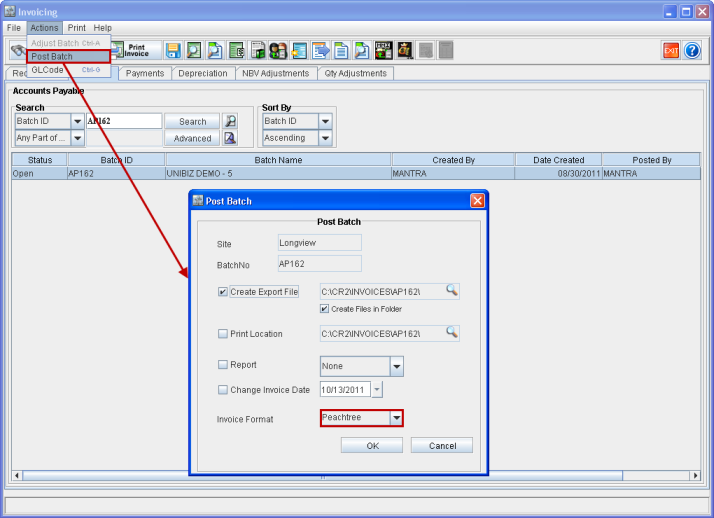
Keeping the currently created Accounts Payable Voucher Batch selected, click on Actions menu > Post Batch.
Select Peachtree as Invoice Format within the Post Batch window that pops-up, as shown in Fig 2.0 given below.
Select Create Export File check box.
Note: The folder to which the files need to be exported can be chosen by clicking the import button present.
Figure 2.0 Posting an Accounts Payable Voucher Batch in Peachtree Format
Click on OK button.
On posting an Accounts Payable Batch in Peachtree format, system will generate the files Purchase.csv, and Vendor.csv. A new file called General.csv will also get created only if there is any Cost of Goods Sold (COGS) and Inventory adjustments made.
For example, if the voucher amount is different from the received cost and the received item was sold and posted before voucher posting then only the system creates General.csv file.
The details of the newly added General.csv file are given below.
Figure 2.1 Peachtree CSV Format File - General.csv

For your reference, the Dist.txt file exported in the Great Plains format for the same Accounts Payable Invoice Batch is also shown in Figure 2.2.
Figure 2.2 Great Plains Format File &endash; Dist.txt

Table 2.0 General.csv Columns
Column Name | Description |
Transaction Number | The Accounts Payable Batch ID is fetched and passed on as the Transaction Number. |
Transaction Date | The Transaction Date is fetched from the AP Batch and is passed on. |
Reference Number | The Voucher ID for the Purchase Order will be fetched and passed on. |
GL Code | For each transaction two entries are created within the exported file. Depending on the entry, the respective GL code namely COGS and INV GL codes will be fetched and passed on. The COGS entries get entered into the General.csv file when there is a difference between the Cost Price and Selling Price of the product. |
Amount | The transaction amount is fetched and passed on as Amount. If it is a debit then it will contain a positive value and if it is a credit it will contain a negative value. |
Entity | The Vendor ID from whom the Purchase was made is fetched and passed on as Entity. |
Class | This column is left blank. |
Number of Transactions | The total number of transactions per voucher for which this AP Batch was created is summed up and passed on in this field. |
Description | This field passes on the type of transaction that has happened like Purchase Order (PO) Voucher. |
Posting Depreciation Batches in Peachtree Format
Instructions for posting a Depreciation Batch in the Peachtree format are:
Go to CR2 > Invoicing > Depreciation tab.
Click on New icon.
Enter a suitable Description.
Enter an appropriate Closure Period.
Click on Create icon. All the available depreciations for the given closure period gets added to this batch.
Click on Exit icon.
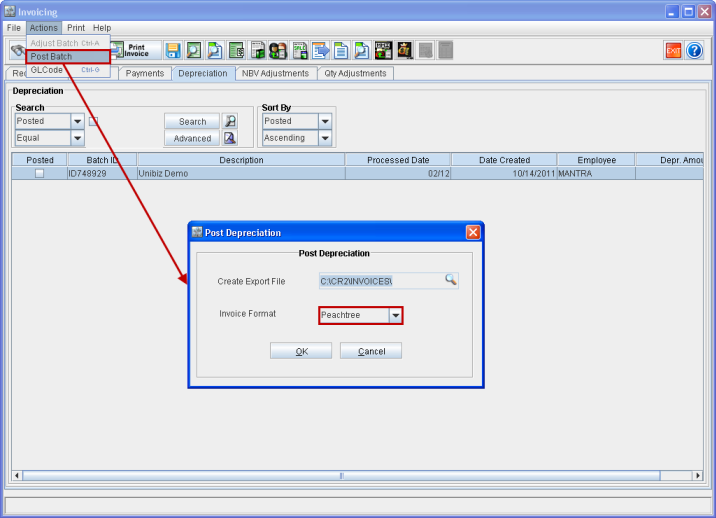
Keeping the currently created Depreciation Batch selected, click on Actions menu > Post Batch.
Select Peachtree as Invoice Format within the Post Batch window that pops-up, as shown in Fig 3.0 given below.
Select Create Export File check box.
Note: The folder to which the files need to be exported can be chosen by clicking the import button present.
Figure 3.0 Posting Depreciation Batch in Peachtree Format
Click on OK button.
On posting a Depreciation Batch in Peachtree format, system will generate the files named General.csv (as shown in Fig 3.1 given below), Customer.csv, and Sales.csv.
Figure 3.1 Peachtree CSV Format File - General.csv

For your reference, the Dist.txt file exported in the Great Plains format for the same Depreciation Batch is also given in Fig 3.2 given below.
Figure 3.2 Great Plains Format File &endash; Dist.txt
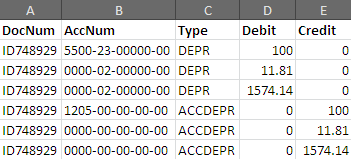
Table 3.0 General.csv Columns
Column Name | Description |
Transaction Number | The Depreciations Batch ID is fetched and passed on as the Transaction Number. |
Transaction Date | The Period is fetched from the Depreciations Batch and is passed on. |
Reference Number | The Depreciation Batch ID is fetched and passed on as the Reference Number. |
GL Code | For each transaction two entries are created within the exported file. Depending on the entry, the respective GL code namely Depreciation and Accumulated Depreciation GL codes will be fetched and passed on. |
Amount | The transaction amount is fetched and passed on as Amount. If it is a debit then it will contain a positive value and if it is a credit it will contain a negative value. |
Entity | This column is left blank. |
Class | This column is left blank. |
Number of Transactions | The total number of transactions for which this Depreciations Batch was created is summed up and passed on in this field. |
Description | This field passes on the type of transaction that has happened like Depreciation or Accumulated Depreciation. |
Posting NBV Adjustments Batches in Peachtree Format
Instructions for posting a NBV Adjustments Batch in the Peachtree format are:
Go to CR2 > Invoicing > NBV Adjustments tab.
Click on New icon.
Enter a suitable Batch Name.
Select Add NBV Adjustments icon. All the Adjustments that are yet to be posted to date will get added.
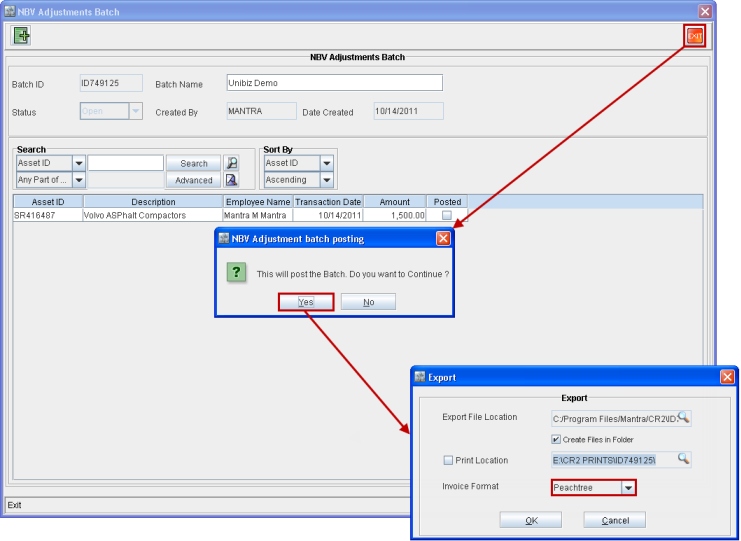
Select Exit button. System prompts the message ”r;This will post the Batch. Do you want to continue?”.
Select Yes.
Select Peachtree as Invoice Format within the Export window that pops-up, as shown in Fig 4.0 given below.
Select Create Files in Folder check box.
Note: The folder to which the files need to be exported can be chosen by clicking the import button present.
Figure 4.0 Posting a NBV Adjustments Batch in Peachtree Format
Click on OK button.
On posting a NBV Adjustments Batch in Peachtree format, system will generate the files named General.csv as shown in Figure 4.1.
Figure 4.1 Peachtree CSV Format File - General.csv

For your reference, the Equipment Adjustments.txt file exported in the Great Plains format for the same NBV Adjustments Batch is also shown in Figure 4.2.
Figure 4.2 Great Plains Format File &endash; Equipment Adjustments.txt

Table 4.0 General.csv Columns
Column Name | Description |
Transaction Number | The Asset NBV Adjustment Batch ID is fetched and passed on as the Transaction Number. |
Transaction Date | The Transaction Date is fetched from the NBV Adjustment Batch and is passed on. |
Reference Number | The NBV Adjustment ID is fetched and passed on as the Reference Number. |
GL Code | The GL Code which is given at the time of adding the Adjustments will be fetched and passed on. |
Amount | The transaction amount is fetched and passed on as Amount. If it is a debit then it will contain a positive value and if it is a credit it will contain a negative value. |
Entity | This column is left blank. |
Class | This column is left blank. |
Number of Transactions | The total number of transactions for which this NBV Adjustments Batch is created is summed up and passed on in this field. |
Description | This field passes on the type of transaction that has happened like Equipment Adjustment. |
Posting Quantity Adjustments Batches in Peachtree Format
Instructions for posting a Quantity Adjustments Batch in the Peachtree format are:
Go to CR2 > Invoicing > Qty Adjustments tab.
Click on New icon.
Enter a suitable Batch Name.
Select Add Unposted Adjustments icon. All the Adjustments that are yet to be posted to date will get added.
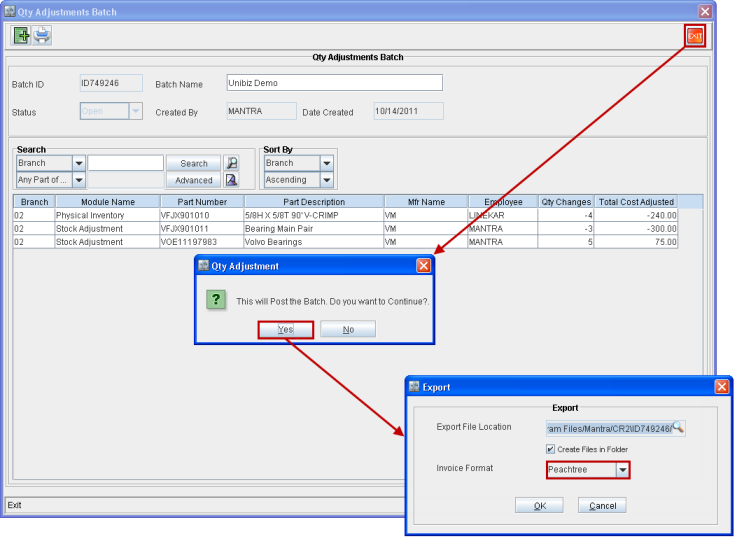
Select Exit button. System prompts the message ”r;This will post the Batch. Do you want to continue?”.
Select Yes.
Select Peachtree as Invoice Format within the Export window that pops-up, as shown in Fig 5.0 given below.
Select Create Files in Folder check box.
Note: The folder to which the files need to be exported can be chosen by clicking the import button present.
Figure 5.0 Posting a Quantity Adjustments Batch in Peachtree Format
Click on OK button.
On posting a Quantity Adjustments Batch in Peachtree format, system will generate the files named General.csv as shown in Figure 5.1.
For every transaction two entries will be created within the General.csv file as shown in Figure 5.1.
They are:
The first entry affecting the COGS GL account and
The second entry for the Inventory General Ledger (INV GL) account (As it is currently working in Great Plains format).
Note: COGS GL code will be formed as per COGS GL setup and INV GL will be formed as per PURCH GL setup in the Invoicing module. The details of the newly added General.csv file are given below.
Figure 5.1 Peachtree CSV Format File - General.csv

For your reference, the Dist.txt file exported in the Great Plains format for the same Quantity Adjustments Batch is also given in Fig 5.2 given below.
Figure 5.2 Great Plains Format File &endash; Dist.txt

Table 5.0 General.csv Columns
Column Name | Description |
Transaction Number | The Quantity Adjustment Batch ID is fetched and passed on as the Transaction Number. |
Transaction Date | The Transaction Date is fetched from the Quantity Adjustment Batch and is passed on. |
Reference Number | The Part ID is fetched and passed on as the Reference Number. |
GL Code | For each transaction two entries are created within the exported file. Depending on the entry, the respective GL code namely COGS and INV GL codes will be fetched and passed on. |
Amount | The transaction amount is fetched and passed on as Amount. If it is a debit then it will contain a positive value and if it is a credit it will contain a negative value. |
Entity | This column is left blank. |
Class | This column is left blank. |
Number of Transactions | The total number of transactions for which this Quantity Adjustments Batch is created is summed up and passed on in this field. |
Description | This field passes on the type of transaction that happened, as to whether it was a stock received or a stock reduced. |