
Editing a Batch
Table of Contents
To Remove Invoices From a Batch
Add invoiced orders to your batch. Highlight the invoice line you wish to delete. Click on Remove Invoice.
This deletes the highlighted invoice from an unposted batch.
NOTE: Invoices may be removed before and/or after you print an edit list, but not after posting.
To Edit invoices on a Batch
Add invoiced orders to your batch.
You should be at the Invoice Batch window. Highlight the invoice you wish to edit.
Click on Edit Invoice.
The Invoice Details window appears. This window shows order line details. Grayed out data fields can not be changed.
Make changes as necessary.
Click on the Exit button.
This returns you to the Invoice Batch window. Both the invoice and order are effectively edited.
NOTE: Invoices may be removed before and/or after you print an edit list, but not after posting.
Printing an Edit List
After creating an invoice batch, you will likely wish to review preliminary Invoices before posting.
To Print an Edit List
Begin at the main invoicing screen.
Highlight Batch. Select Actions/Post Batch
Check the Report Box
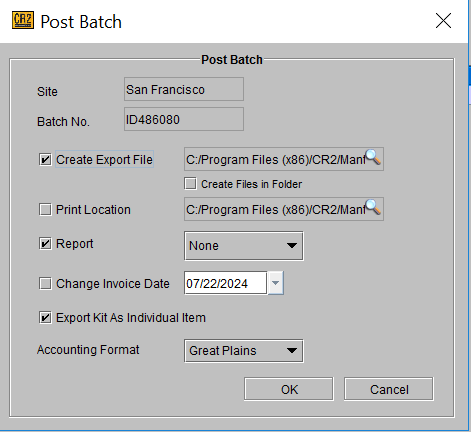
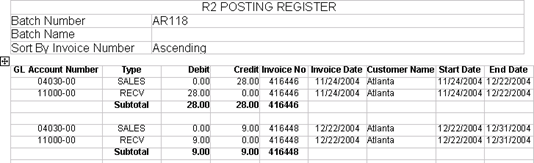
Invoice Posting Register is Generated. Sample Invoice Posting Register:
Posting a Batch
A batch is ready to Post after you have printed an edit list and verified all invoice amounts. TO POST A BATCH
Begin at the Invoicing window.
Highlight a batch that is ready to Post.
Select Actions > Post Batch from the upper menu line.
The Post Batch dialog will appear.
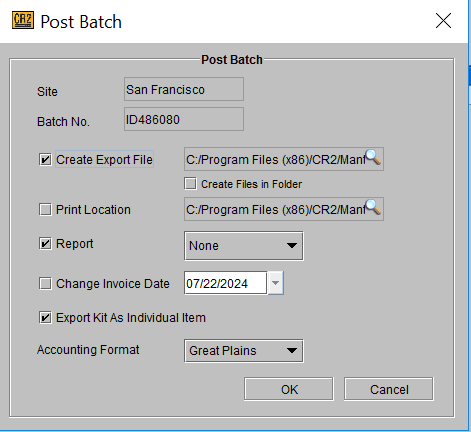
Check the applicable Posting options.
NOTE: At a minimum, you must check CreateExportFile and enter a file destination, otherwise the batch will not post.